McLarens and CarPlay
Thursday, Jan 16, 2025
For as long as I can remember, I've always been a fan of motorsport. Not the one where you turn left for 400 laps, I mean like the other racing: Formula 1, Le Mans, IndyCar, etc. The fact that there's teams dumping hundreds of millions of dollars of research into the sole goal of building the fastest car, is so pure and simple. The goal itself is simple, but the actual requirements to build something that's capable of going more than 225 miles per hour for 50+ laps straight and not fall apart is the hard part.
This, as well as playing copious amounts of Need for Speed, Forza, and Gran Turismo, are also the reason I’ve always been drawn to driving sports cars (particularly British, and mid-engine), and of those, those made by vendors that had a significant investment in motorsport. My first roadster was a 2006 Lotus Elise in Solar Yellow. It was so fun to zip around in. It was a super lightweight mid-engine convertible go kart, that also happened to be legal for the road. Built by a company with a legendary presence in Formula 1, it prioritized lightness and handling above all else, especially cost. The steering feel of that car was very direct (no power steering, just raw input from the road), and the interior had basically nothing above the bare essentials (except maybe climate controls, but nothing else, no carpets, not even power windows!).
It was with that, that I experienced some of my first track days racing with other Lotus owners in the Bay Area (many of which were extremely talented and humbled me into knowing just how much I was lacking in the experience department). However, being the Bay Area, it’s riddled with people who don't know how to drive (especially in the rain), and due to the Elise being basically a single fiberglass shell, it was actually really stressful to drive. Wicked fun, but if anyone ever tapped it faster than 2mph, it’d basically be a write off (since replacing the single clamshell cost more than the car itself).

It was for this reason that I eventually shifted to a Lotus Evora 400. The Evora lineup was meant to act as a compliment to the Elise and the Exige. Where the Elise and Exige were primarily focused on being as raw as possible, the Evora was more focused on being a useable road car… that could also put in some wicked lap times. That was actually one of the things that most surprised me when I first drove it, even though the interior was more comfortable, the handling and feel was never lost, in fact it felt just as good as my Elise. A slightly roomier cabin, but still a two seater with an even faster 0-60 (no convertible though, sadly). It was with the Evora that I learned almost everything I know nowadays about spirited driving and track days. Having put tons of miles into that car, driving it every day for ~5 years, I learned to appreciate all it had to offer (and all the extremely strange quirks that went with it). I still got to hang with the Lotus Club, that community really does have some of the nicest people I’ve ever met / learned from; nothing but pure passion and appreciation for motorsport. The amount of confidence you get driving these Lotus cars in corners (due to them being both mid-engine and having a fantastic center of gravity), just makes you want to push it more and more. From steadily improving my times at Thunderhill and Sonoma, to conquering the Corkscrew at Laguna Seca in the rain, I learned a lot about car control, braking, and improving entry / exit speeds.

I'll Have What He's Having
A couple summers ago though, my family ended up renting my dad a few laps in a Ferrari 458 as a gift for his birthday. Growing up he was always fixing cars in the garage (this is also probably a huge reason why I’m so into cars nowadays), so it felt fitting to let him experience something a little faster than the Volkswagens he would drive on the daily. Upon booking the rental for him, I also noticed a few other cars you could rent: a Porsche 911 GT3 RS, a Lamborghini Huracan, and a McLaren 720S.
It was at this point where I had the brilliant idea to also rent myself another mid-engine British race car.
McLaren has always been my number one car manufacturer (with Lotus as a close second), with another legendary presence in motorsport, especially Formula 1. Ever since the McLaren F1 launched at around the time I was born, it was the dream car I would always pick in every single racing game and still to this day is my all-time favourite car. This dream will still sadly probably stay a dream as buying one of the ~106 available globally nowadays will probably set you back at least 20 million dollars (I'm accepting donations if anyone's inclined!).
The McLaren F1 was built with the goal to build the best driving car ever, with no compromises. Turns out, their framework for building it worked so well that they ended up building arguably the best car of all time and held the record for the fastest road car for nearly 13 years straight (reaching a top speed of 240mph). The car was so good, in fact, that they slightly modified it, called it the McLaren F1 GTR, entered 4 of them into the 24 Hours of Le Mans, and then proceeded to win first, third, fourth, and fifth place at their first Le Mans ever. This sadly will probably never happen again as most, if not all, cars in that race nowadays are purpose-built for Le Mans vs. the McLaren F1, a road car being so good it could basically roll up to the start line unchanged. Speaking of wins in motorsport, they're also one of the only manufacturers ever to win the Motorsport Triple Crown (winning Le Mans, the Indianapolis 500, and the Monaco Grand Prix… with Ayrton Senna no less, one of the greatest Formula 1 drivers of all time). The livery of Senna's MP4/6 still lives rent-free in my head and I still cheer them on each year in Formula 1.

Seeing as though I would have an opportunity to drive one of McLaren's other cars and experience what goes into their DNA, I decided to rent the 720S.
Upon stepping into this fighter jet on wheels, I realized that it felt familiar. It gave the same feelings that my Lotus cars gave, a race car that was legal enough to be driven on the road. Off the initial line, I couldn't help but notice that this thing was basically like the NOS scenes you see in Fast in the Furious. You know, where the cars enter hyperspace and get 2x the horsepower when they turn on the NOS tanks, because, damn, it was fast. 0-60mph in like 2.8 seconds (for context, my Evora was almost twice as slow). Not only was it crazy fast, but it was also super stable, as long as you weren't oversteering in the corners and dumping the throttle, never once did I feel like I was losing control. Just like the Elise and Evora, the steering felt super direct and gave tons of information and feeling of the road. A lot of cars nowadays tend to dampen the steering and make it feel way lighter than it really is, but they nailed the steering feel in this car. The car also has this super cool hydraulic suspension system so it's always planted on the road and basically never runs out of grip. If you go over a bump and one wheel on one side of the car is raised, the other wheel on the other side is lowered to compensate and balance the car out. Those feelings sparked so much confidence that only after a couple laps I was flying past other Porsche 911 GT3 RSs as if they were Toyota Priuses. The instructor asked “Have you driven one of these before?”, of course my answer was no, I had only wished I did, but it just felt like a natural progression from the Lotus cars. Raw, direct feedback from steering, mid-engine weight distribution, yet literally 100x faster. It felt like a rocket ship glued to the ground. I remember parking the car and my dad asking "How was it?", I then replied "I need to get one of these".
1 Year Later
For the next year, I could not get the feeling of driving that 720S out of my head. It was one of the most remarkable driving experiences I've ever felt and was probably the closest I'll ever get to experiencing a fraction of what a Formula 1 car is like. I still loved driving my Evora, but this was something else entirely.
Later that year I decided to go visit McLaren of San Francisco "just to see" what they had.
A test drive and a week later, I then said goodbye to my Evora 400 and hello to a McLaren 720S Spider in McLaren Orange (one of the best colours IMO).

Now for context, in case it wasn't obvious, the Evora was my daily driver and as such this took its place. I've never really liked having multiple cars, and I find that the best way to learn everything about a car is to drive it everywhere (or at least wherever possible). This includes everything from getting groceries (the front trunk can actually hold a lot), to sitting in 280 traffic, spirited driving in the Santa Cruz mountains, and even ripping past turn 1 at Sonoma Raceway.
This car is absolutely incredible, and is something I'll be holding onto for a very long time. I'm excited to drive it every time I get to flip the door up vertically, step into the cockpit, press the big red Engine Start button, and hear the twin turbo 3.8L V8 rev up. The interior is sleek and simple, with a buttonless leather and carbon fiber steering wheel (no media controls, no HVAC, just a steering wheel). It's rare to find this nowadays, especially with so many other companies making their steering wheels have more buttons than an Xbox Controller, having terrible touch controls, or being stupid and choosing a yoke instead of a wheel entirely. It's also super comfortable, and has a massive front windshield with lots of visibility. Even the rear quarter panels are transparent so your blind spots are never blocked. All the other buttons are readily accessible to the driver on either sides of the cockpit all the while feeling super low to the ground (107mm off the ground to be specific). You can tell this was built and designed by people who love driving.
The dual clutch gearbox is so smooth and the way the exhaust sounds as it's cut when it upshifts around 5000 RPM sounds like it's straight out of a science fiction movie. At Laguna Seca I remember I had to carry so much speed through turns 5 and 6 with my Lotus cars (since they can lose a lot of speed trying to go uphill), but this car has so much torque it simply does not care. You could be at a standstill at the bottom of the hill, floor it, and in 5 seconds you'd be going 120mph. For all the extra power it has, it's still just as lightweight as my Evora was. I even got the opportunity to learn how to get it sliding sideways a bit through corners at the track to learn how their ESC (stability control) Dynamic setting works.
I have so much more to say about what it's like to drive and how much appreciation I have for all the engineers and designers that worked so hard to make this car exist, but today I want to focus on telling the story of my experience fixing one of it's smaller flaws…
It doesn't have CarPlay.
Editor's Note: huge first world problem, I'm fully aware.
So What Does It Have?
The 720S was introduced at that awkward phase in car stereo technology times where Bluetooth was everywhere and CarPlay was just starting to exist. However, they sadly didn't seem to get around to implementing it, and it was only equipped with USB iPod support. So, I could use my iPhone for music, but that would require either using Bluetooth or USB.
There's two problems with this however:
- Bluetooth's bitrate maxes out at ~264kbps assuming we're doing AAC (which we are given it's iOS and the car doesn't seem to support anything like aptX or whatever). This is worse than a 320kbps MP3 file, and I could hear the compression artifacts, so this was immediately out of the question.
- USB does provide the best quality, however that requires constantly plugging in the phone anytime I get in the car and I was already used to having wireless CarPlay in my Evora (which again, another huge first world problem, I'm aware).
Now you might think: "Couldn't you just swap the stereo head unit like other cars?". I could, however for the 720S, McLaren built a fully custom bespoke one-off system that I can't quite swap. The system itself controls loads of proprietary things like tire settings, interior lighting, maps, sensors, track telemetry, even Variable Drift Control (you literally get a slider to adjust how much you want to drift!), and as such, nobody has really spent the time or effort to make an aftermarket swap.

Editor's Note: It turns out the newly released 750S now does have CarPlay, but that also didn't feel like a cost-effective solution.
The whole setup is actually pretty sweet, the gauge cluster can flip down to show you just your shift lights when you're in track mode and you get an audible cue when's the optimal time to shift gears.
So anyways, this custom head unit does a ton of stuff, surely there's something we could do with it, right?
Jailbreaking the Car?
Upon further inspection, the infotainment system seems to have been developed by JVC / Kenwood (which lines up properly with this press coverage denoting JVC did a custom system for McLaren). Upon using it though, I figured that it was running a variant of Android due to the distinct way it handles scrolling at the edges of any given screen (you get that glow effect instead of rubber banding like you would on iOS or Windows Phone 🪦). Now considering that this car was unveiled in 2017 and the electrical systems were developed around then (or earlier, technology moves slow in the car space), it's probably not running Lollipop or Marshmallow (since those were bleeding-edge at the time and this is likely an embedded system). I'd bet probably something like Android 3.0, surely we can just jailbreak it right?
Turns out people have already done this with the McLaren 650S and below, apparently adb is running if you connect your car to the iPod USB port. They sadly patched this for the 720S. In addition, after trying some other things, I realized it wasn't actually Android, but a different embedded Linux system entirely (long story… probably for a future blog post maybe)… so I guess I'll just take the dash apart and try to jailbreak it myself?
Yeah… no. Given how fun of a project that would be to try, I'd really rather not accidentally brick my car. I don't think the dealership would be cool with me bringing it in for service to somehow reflash the infotainment system with a proper image because I managed to get it to not turn on anymore. Loads of Android devices are trivial to hack since they all have fastboot and you can just restore it if you mess something up, but I'm gonna wager that nobody has dumped the software off this system nor has McLaren hosted bootloader images on GitHub. It also seems extremely cumbersome to try and take all of the dash apart, so… yeah, no.
Feeling rather bummed that his avenue was not gonna happen, I started thinking about what I was trying to optimize for: enable wireless playback of my music in my car, with media controls, and at the highest bitrate I can (or at least better than Bluetooth). It was at this point that I remembered that wireless CarPlay operates by first setting up a WiFi network over Bluetooth and then streams CarPlay via AirPlay over WiFi to the car. So maybe I could make my own "CarPlay"? What if somehow I added AirPlay to my car? I saw projects where people ripped up old AirPort Expresses, but I needed to run off a cigarette lighter and not have something nuke the small racecar-optimized battery, so I settled on a Raspberry Pi. They only require 5v at like 5 or 6 watts or so, so the energy usage would be mostly the same as having my iPhone plugged in.
Upon setting up a lite version of Raspbian, I started looking for projects that implemented an open source AirPlay receiver server and I came across shairport-sync. Turns out Mike Brady did all the hard work and already thought of this use case (thank you Mike!). Once setup, you'll have a Raspberry Pi that broadcasts a WiFi network and an AirPlay server that'll output whatever it receives over 3.5mm / AUX. My car did in fact have a 3.5mm input jack, however initial testing resulted in a ton of electrical noise (static, clicking, etc.) coming out the speakers. Turns out the way my car was wired up really didn't like the electrical interference that was created when you hooked a Raspberry Pi up to the cigarette lighter or iPod USB port and then played that same device over 3.5mm back into the car. After spending a couple days trying to debug and troubleshoot with some ground-loop inhibitors and various cables, I still couldn't get a clean signal (maybe it was still interference, maybe just the Pi's DAC, no idea), so I started over.
iPod USB
It turns out the Raspberry Pi's USB-C port supports USB OTG, meaning the Raspberry Pi could dynamically switch that USB port from being a host port (e.g. hosting a keyboard) to a device port (e.g. act as a device that the car could host).
I then started looking through tons of stuff to see how I could somehow "emulate" an iPod via my Raspberry Pi. I looked through RockBox source code, thought about virtual machines, anything really, but I eventually stumbled across ipod-gadget.
This project was perfect:
ipod-gadget simulates an iPod USB device to stream digital audio to iPod compatible devices/docks. It speaks iAP (iPod Accessory Protocol) and starts an audio streaming session.
So assuming this works, I could plug the Raspberry Pi into the car and have it think it's an iPod. I had doubts it would work without issue as it had tons of patches for specific stereo head units, but I set it up just to see what would happen. I configured Shairport Sync to use hw:iPodUSB as this was the ALSA audio device that it exposes, went to the car, plugged it in and…
UNSUPPORTED DEVICE
:(
So either the car didn't recognize the "iPod" or the "iPod" didn't recognize the car. The ipod-gadget project involves two parts:
- A Linux character device (/dev/iap0`) you send stuff to (to send over USB)
- A client app (
ipod) written in Go that talks to said device.
Upon trying to inspect the logs output by the ipod server binary, it didn't produce anything meaningful. I then did a sanity check with my home stereo to see if it would do anything, and it worked perfectly.
I brought it back to the car and tried again just to see, and no matter what I tried, it would constantly fail to connect. I then re-checked the logs with the ipod server running on the Pi with more verbosity and then I noticed there were a bunch of packets that would fail to parse and would be dropped. So I patched that bit of code to just spit out raw bytes to see if I could get anything.
A few things seemed to stream out and then it would just stop (here, >>> means incoming, as in car -> Raspberry Pi).
>>> 0xFF 0x55 0x02 0x00 0xEE 0x10 0x00 0x00

>>> 0xFF 0x55 0x02 0x00 0xEE 0x10 0x00 0x00

>>> 0xFF 0x55 0x02 0x00 0xEE 0x10 0x00 0x00
I took what I saw, and dumped it into the GitHub search box.
🤷♂️ 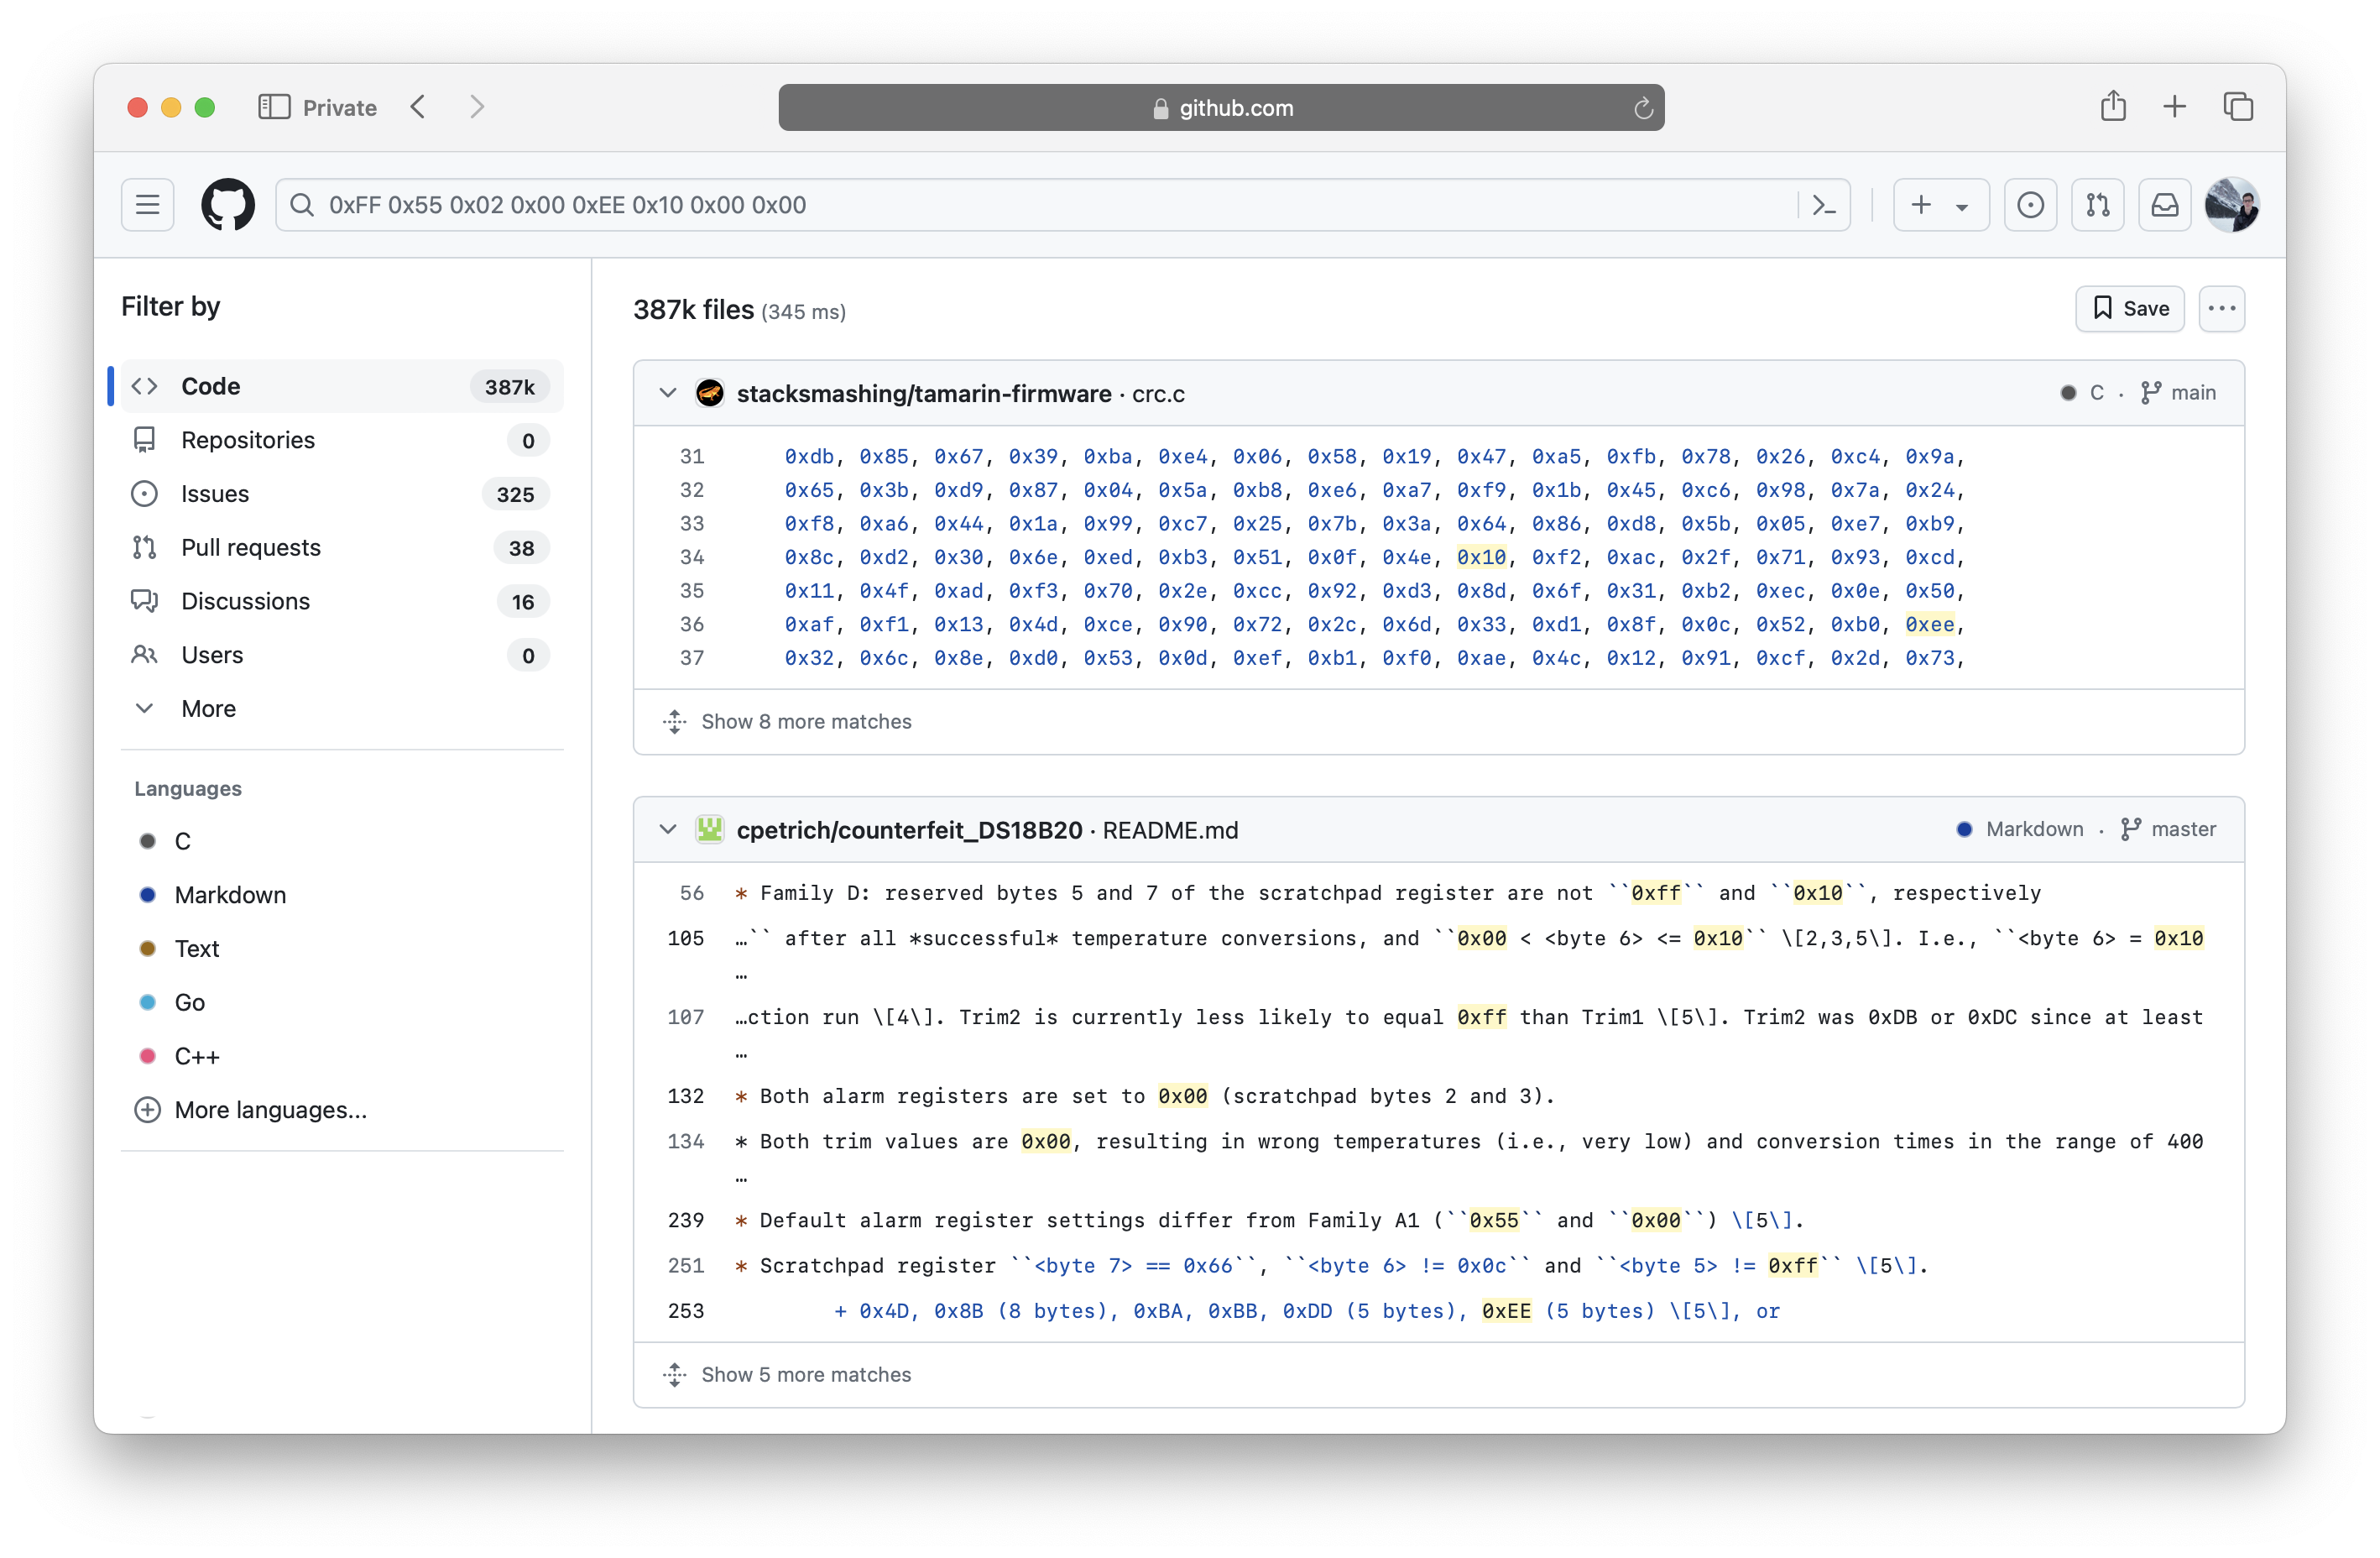
I wish it would've been that easy. Trying a few permutations finally lead me somewhere...
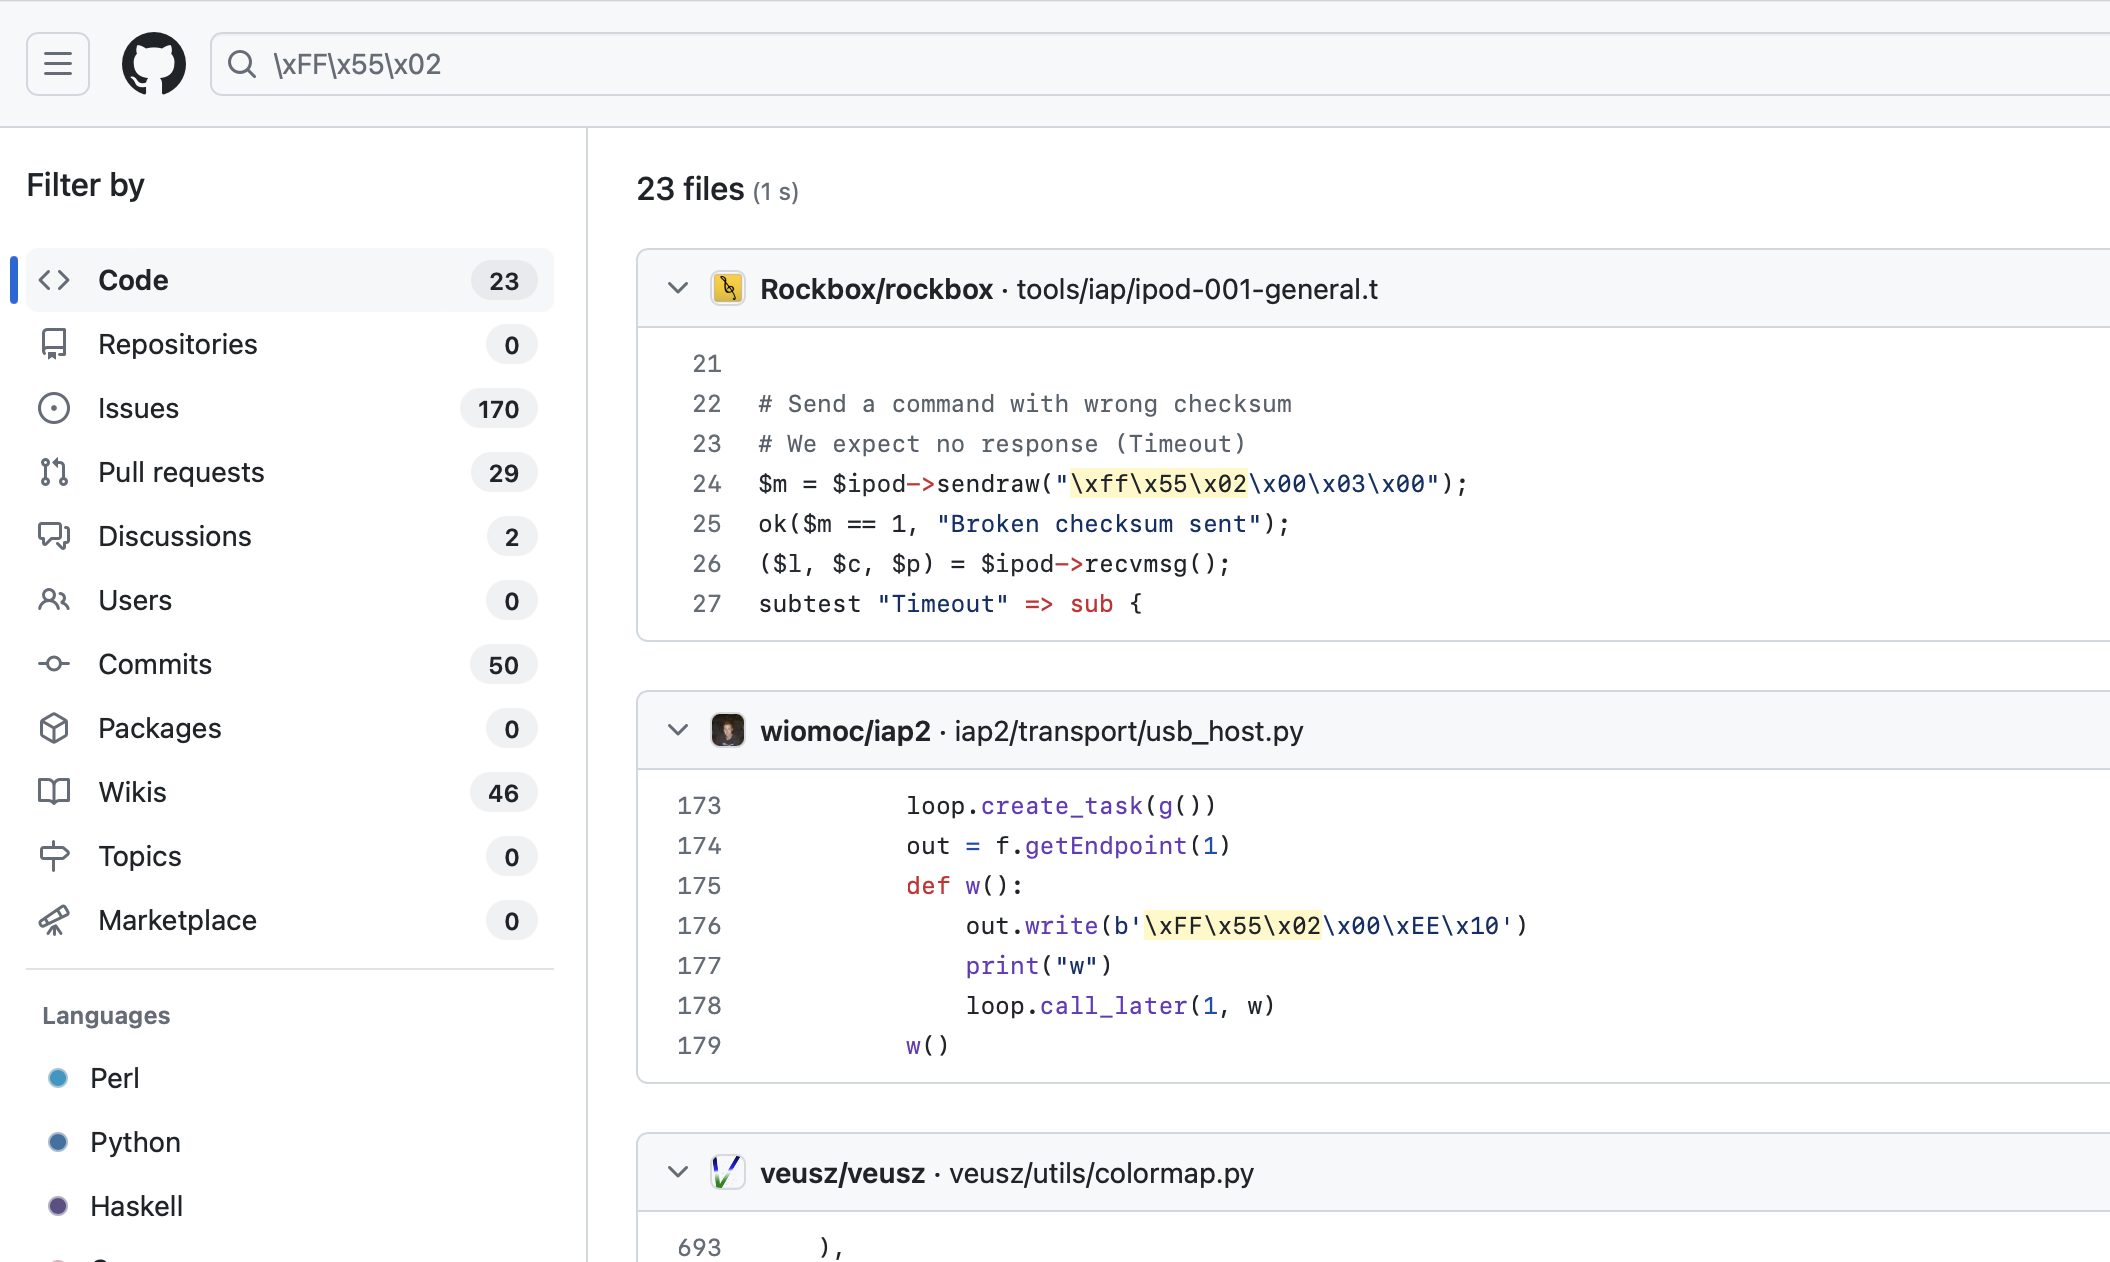
This search result was just pure luck, but it was super helpful. Notice how the first result is Rockbox, which is an open source media player implementation that runs on old iPods. As such it also implements the same protocol as the ipod-gadget (iAP). However, it isn't referencing that byte sequence we're looking for, the project below it wiomoc/iap2 is.
Upon reading wiomoc's extremely helpful blog post I now knew what I was dealing with.
My car's stereo didn't implement iAP1… but iAP2 and has "iPod" listed in the car's infotainment as in "iPod Accessory Protocol"… not necessarily supporting "iPod devices". So having read through most of Christoph's (wiomoc) post (thank you for writing this!), I got the idea to just send back the same sequence of bytes the car was sending me. Apparently this is a way for a device to acknowledge that it talks iAP2.
I modified the go ipod project and upon doing this, I had thousands of bytes streaming on the screen to parse through (here, <<< means outgoing, as in Raspberry Pi -> car):
>>> 0xFF 0x55 0x02 0x00 0xEE 0x10 0x00 0x00

<<< 0xFF 0x55 0x02 0x00 0xEE 0x10 0x00 0x00

>>> 0xFF 0x5A 0x00 0x1D 0x80 0x74 0x00 0x00
    0x96 0x01 0x05 0x10 0x00 0x0F 0xA0 0x00
    0x49 0x1E 0x05 0x0A 0x00 0x01 0x0C 0x01
    0x01 0x0B 0x02 0x01 0xA8 0x00 0x00 0x00 ...
Neat.
Now what?
Upon reading more of the blog post and iap2 project, I realized I was probably going to have to do a lot of stuff on my own. Apple's iAP2 protocol documentation is only available to members of Apple's MFI program, and to qualify for the program, you basically have to be an accessory maker (e.g. Belkin) that makes or ships thousands of MFI devices. As such, I basically only had open source projects to go off, and thankfully the iap2 project was enough to get me started.
Let's Emulate an iPhone in Swift
The idea, in theory, was what if I could just take my Raspberry Pi and convert it into an "iPhone", but only do enough of the parts that iAP2 cares about to play audio.
To start, I used the ipod-gadget project again in order to reuse that character device /dev/iap0 over which I could send and receive bytes. This project already has the correct USB HID descriptors and whatnot setup to mask as an iPhone, so it saved a lot of time doing the basics.
Next I started a Swift command line utility project that I could compile and run on Linux (since I was running this on a Raspberry Pi).
Sidenote: Swift on Linux is pretty great nowadays. You can just build and run on Linux. You can't use Xcode to debug on Linux, but it's pretty trivial to debug remotely with Visual Studio and the various extensions.
After that, I setup the basis for reading and writing bytes to/from the character device using a DispatchSource both for input and output:
self.io = try! FileDescriptor.open("/dev/iap0", .readWrite, permissions: .ownerReadWriteExecute)
self.buffer = UnsafeMutableRawBufferPointer.allocate(byteCount: 1024, alignment: MemoryLayout<UInt8>.alignment)

self.queue = DispatchQueue(label: "ca.adambell.HIDReader", qos: .userInitiated, autoreleaseFrequency: .workItem)
self.source = DispatchSource.makeReadSource(fileDescriptor: io.rawValue, queue: queue)
source!.setEventHandler { [weak self] in
    guard let self else { return }
    do {
        let bytesRead = try io.read(into: buffer)

        ipod.parseBytes(bytesRead)
    } catch {
				// handle errors
    }
}
For output, all I had to do was encode stuff as little-endian bytes and write them to the character device:
self.queue = DispatchQueue(label: "ca.adambell.HIDWriter", qos: .userInitiated, autoreleaseFrequency: .workItem)
self.source = DispatchSource.makeWriteSource(fileDescriptor: io.rawValue, queue: queue)
source.setEventHandler { [weak self] in
    guard let self else { return }

    while let report = reportQueue.popFirst() {
        _write(report)
    }

    if reportQueue.isEmpty {
        source.suspend()
        self.writing = false
    }
}

let bytesToSend = [0xff, 0x55, 0x02, 0x00, 0xee, 0x10, 0x00, 0x00]

queue.async { [weak self] in
    guard let self else { return }

    reportQueue.append(bytesToSend)
		source.resume()
}
Originally I tried using Swift 6 actors / async / await, however I had to switch back to plain old Dispatch as it turns out that Task and DispatchSource really don't play nicely together yet (see: FB14132060) :(
So once I got the project up and running I began map out what exactly I wanted to get working:
- Music Playback (obviously)
- Track Metadata (hopefully cover art?)
- Media Controls (if I can make it work)
The infotainment system in the car supports a bunch of stuff like browsing your Music library and accessing playlists, but I didn't care about much of that since I was just going to be using AirPlay. I could control all that from my iPhone mounted to the dash.
Continuing on, I got back to the same spot I was at with reading bytes with the original ipod client (however, at this point it was all in Swift!):
>>> 0xFF 0x55 0x02 0x00 0xEE 0x10 0x00 0x00

<<< 0xFF 0x55 0x02 0x00 0xEE 0x10 0x00 0x00

>>> 0xFF 0x5A 0x00 0x1D 0x80 0x74 0x00 0x00
    0x96 0x01 0x05 0x10 0x00 0x0F 0xA0 0x00
    0x49 0x1E 0x05 0x0A 0x00 0x01 0x0C 0x01
    0x01 0x0B 0x02 0x01 0xA8 0x00 0x00 0x00 ...
Referencing wiomoc's blog post once more, I noticed a small detail:
Therefore it first sends a message to the accessory requesting the certificate of the Authentication Coprocessor. The accessory retrieves this certificate from the Coprocessor and send it in a response message. The iPhone checks if this certificate is signed by Apple. Upon successful validation, the iPhone generates a challenge and transmits it to the accessory. [...]
After this authentication procedure is completed, the accessory sends some identification information, like name, serial number, supported transports or offered EA protocols to the iPhone. After an acknowledgement from the iPhone, the iAP2 Connection is fully established.
Crap.
I thought the whole project was probably screwed at this point since I had no way of getting ahold of said iPhone Authentication Coprocessor. Without said coprocessor, I'd never be able to authenticate a session. It's probably baked into the iPhone's system on a chip and I had absolutely no means of taking it out or repurposing it.
However, then I realized, I'm not communicating with an iPhone… I'm spoofing one and talking to the infotainment system.
In order to get an accessory to do anything, you need to have the accessory "identify" itself. Once that starts, it'll then authenticate itself with an iPhone and will use the onboard authentication coprocessor to validate that the MFI accessory is "legit".
In my case, since I'm the super totally legit iPhone™ that's "authenticating" the infotainment system, I can just send a thumbs up to whatever it says.
Infotainment System: "Hey I'm a licensed MFI car stereo: here's a signed challenge showing I'm legit"
Me (a totally legit iPhone):
func checkChallenge() {
    return true
}
"… Sure! You're good 👍"
I then loosely used wiomoc's code as a point of reference and built out the initial session setup and communication channels necessary to get me to the identification phase. Once I implemented this, gone were the "Unsupported Device" errors that my car was showing me. I still had tons of bytes being thrown at me that I had no idea what they were, but it was connected.
For fun I tried AirPlay-ing what I was listening to at the current time (I remember it vividly, it was "A Walk in the Woods" by Marty O'Donnell from the Halo: Combat Evolved Soundtrack)… and it worked!! It turns out all my car cared about was an initial iAP2 session and then it'd just play whatever was coming over USB by any UAC (USB Audio Class) device!

Editor's Note: QuickTune is fantastic. Great work Mario!
I'd AirPlay my iPhone to the Raspberry Pi, it'd create an iAP2 session and then just dump whatever was coming over AirPlay to the car's infotainment system.
This crazy wild combination of devices ACTUALLY WORKED:
iPhone → [shairport-sync] → [ipod (swift tool)] → McLaren Infotainment System
So here's where we were at:
Music Playback (obviously)- Track Metadata (hopefully cover art?)
- Media Controls (if I can make it work)
Now, since I do a lot of track days, I also have McLaren P1 race bucket seats installed in my car. They're fantastic for hugging your body as you take corners super quickly, but absolutely horrible for posture / hacking on things in the car. My neck and back started to hurt after a few of nights of hacking on things in the driver's seat.

In addition, it turns out that my code was originally so bad, I would sometimes send invalid bytes to the car… and the car's infotainment system would just lockup or crash / restart. So I'd have to shut the car off, restart it (in accessory mode, no need to power on the engine), and keep it hooked up to a trickle charger to ensure the battery didn't die as the alternator isn't running without the engine on.
For the sake of my spine, I really needed to figure out an alternative to continue working on this project.
Knowing how software works in most of the tech industry, if a company has functional software, chances are they won't rewrite it for other things (if it works, why rewrite it?). Heck, apparently some companies still rely on WebObjects running on a Mac Mini somewhere under someone's desk. Chances are, if JVC / Kenwood built an infotainment system for McLaren, they probably borrowed a lot of code they already had for other stereos (their implementation of iAP2). In this case, I assumed I could just buy another Kenwood stereo from Best Buy and hack on that instead. If I got things working with that, it should work with my car with little modification. As such, I bought a super cheap single DIN stereo and stuck it on my desk. I had to hard wire some power lines and hook up some speaker cables (it was extremely sketch), but eventually I had a "similar" car stereo on my desk I could mess with.
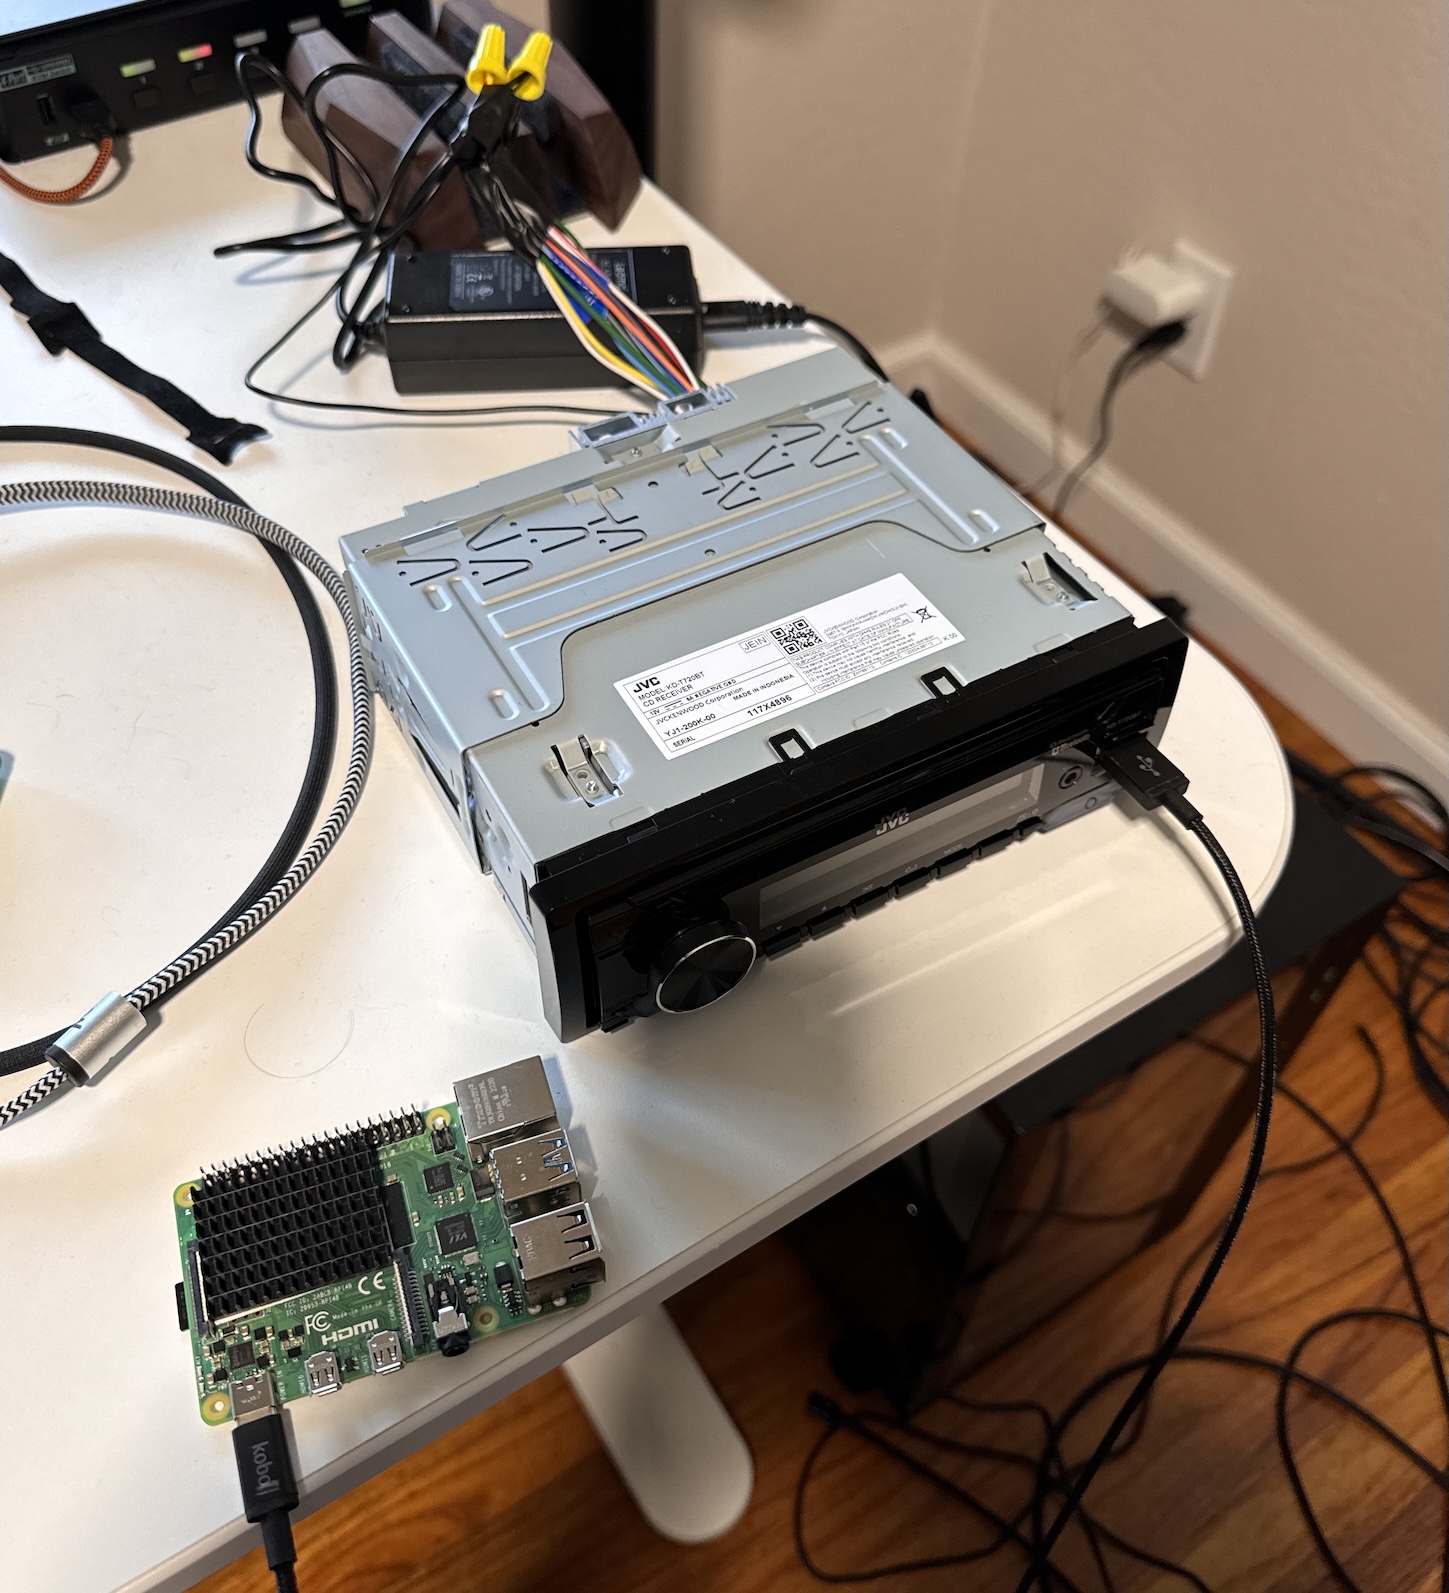
I plugged in the current WIP I had with the Raspberry Pi and worked out of the box! Shared code!

Sadly, progress on this project swiftly¹ halted as wiomoc's code didn't really cover any sort of media / metadata iAP2 stuff.
That's where I had to get a bit more crafty…
Hanging Out With HID
When reverse engineering APIs for the web, you typically setup some sort of man-in-the-middle attack and read the incoming or outgoing requests. A lot of people default to things like mitmproxy, Proxyman, Wireshark, or Charles Proxy. Now, normally if this were over the web, that's what I'd be pulling out. However, this is all over USB, and I didn't know the format I was working with, so what I sorta needed was a USB Proxy for HID (which is what all the messages are sent over).
Turns out, there's a project that does just that: usb-proxy. It worked great initially, but often times would crash due to the volume of traffic going over the cable.
Eventually I found an alternative: a pretty sweet project called Cynthion that does what usb-proxy does, but in hardware!!

This thing is wicked cool. You put it in the middle of a USB Device (iPhone) and a USB Host (Stereo) and it basically just spits out all the bytes that goes over the USB cable so you can analyze it. It comes with a tool called Packetry that allows you to analyze each HID frame that comes in:

Notice anything familiar? ^_^
From making the other iAP2 messages work (e.g. identification), I knew the general gist for what things looked like (there's a header, some size bytes, a checksum, blah blah, and a payload), so I just needed an easy way to find the payloads I wanted to replicate. Most of the iAP2 messages seemed to start with 0xFF 0x5A so that made it a lot easier to narrow things down.
Media controls were actually trivial to figure out, so I figured those out first. All I did was run my ipod app and have it spit out any incoming frames / messages it didn't understand. In this case, I would just watch the console as I tapped various media buttons on the stereo (Play, Pause, Next, Previous, etc.). I'd spam tap a button (e.g. Play / Pause) and look for similar packets. I'd then diff them to try to build up an enum:
enum MediaControl: UInt8 {
    case playPause = 0x02
    case next = 0x04
    case previous = 0x08
    ...
}
No idea if this is actually the spec, but in my case, I never actually needed to send these to the car, so I didn't care about figuring out the format. I just needed a means to watch for these packets from the car -> Raspberry Pi, get the media button pressed, and then I'd control Shairport Sync myself using the dbus client it exposes:
// Shell is implemented elsewhere, but it just uses Process / Pipe from Foundation
if control == .playPause {
  try Shell.command("dbus-send --system --type=method_call --dest=org.gnome.ShairportSync '/org/gnome/ShairportSync' org.gnome.ShairportSync.RemoteControl.Play")
}
Music Playback (obviously)- Track Metadata (hopefully cover art?)
Media Controls (if I can make it work)
Metadata was a lot more involved. What I was really looking for was a way to display Title, Artist, and Album (and album artwork if possible!) onto the infotainment screen. While this wasn't strictly necessary, I do like being able to see chapter titles from podcasts or songs being streamed on Apple Music. As such, I needed to find the correct offsets / structures to send as USB packets.
I generated a test track and uploaded it to my iPhone with the following:
- Title:
TITLE_HERE - Artist:
ARTIS_HERE - Album:
ALBUM_HERE - Album Art: A simple 512x512 opaque red png.
Note:
ARTIS_HEREis an intentional typo as I wanted a consistent length for the strings sent (10 bytes, aka0xa) to make it easier to find their patterns.
I played this test track on my iPhone when hooked up to the stereo (through Cynthion) and then I found the following bytes in the pcap file:
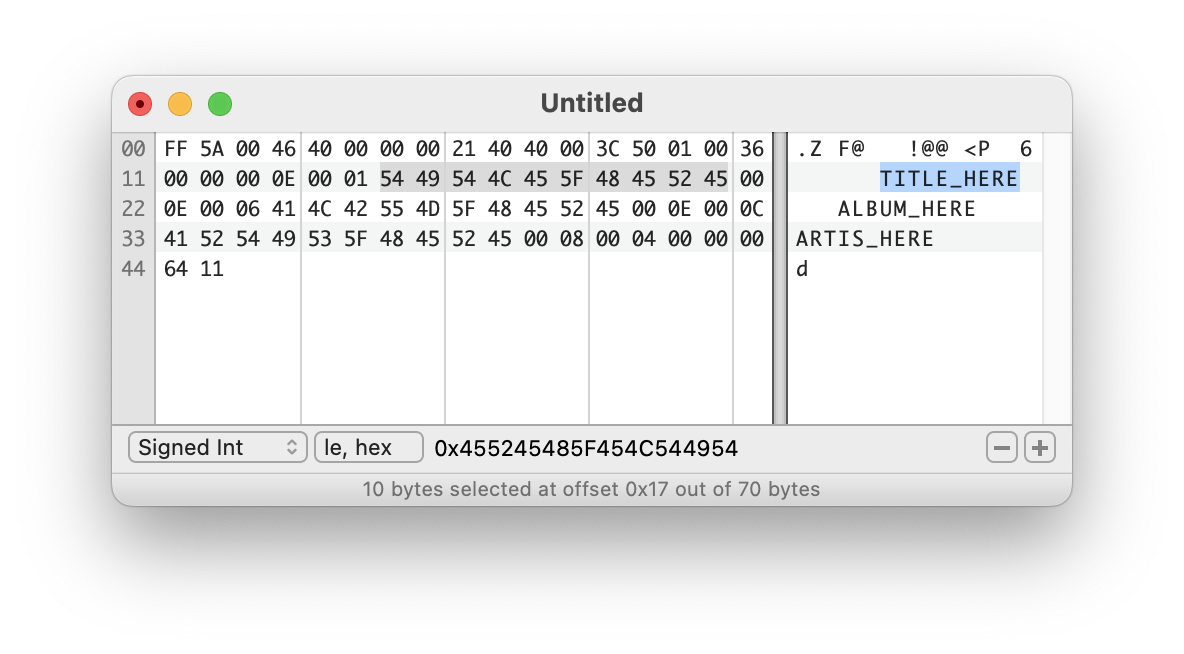
Notice the highlighted area. Before that you have 0xe as the length, but the length of the strings I was sending was 0xa. It turns out that the length also includes the bytes that specify the size (2 bytes) as well as 2 other bytes that indicate the type of information supplied (0x00, 0x01, aka Title), so removing those 4 bytes, we get 10 bytes: 0xe - 0x04 == 10
Initially I wasn't getting anywhere, but it was far easier to iterate on since I could just keep trying new formatted packets to see if anything would appear on the stereo screen. Still having no luck, I tried replaying the same packets dumped via Packetry but still, nothing would appear on the stereo's display. Eventually I realized that there was consistently another packet sent before the track info (more on that later), I didn't really care what it was, but once I sent it before the metadata packet, it then started to display my strings! Sometimes it would crash due to messing up the sizes sent or other orderings, but eventually I got that working just fine.

Editor's Note: Not shown here were the multiple days of trial and error and sheer frustration that comes out of throwing random stuff at a black box until something happens. There were many times where I nearly gave up because of brittle issues that cascaded and broke other things that weren’t even related. Sometimes things would work, sometimes trying the same thing again would fail and crash the unit.
The only thing that was remaining was figuring out how to send cover art. This actually ended up being the hardest part since I had to figure out how to do the File Transfer Session stuff. It turns out you need to specify an identifier for the image to be sent alongside the track metadata (in that "other" packet mentioned above), and then send the image separately in a different session. I got pretty close a few times trying to figure it out on my own, but then I stumbled upon some "questionable" GitHub repos that gave me a lot more hints and then I eventually got artwork displaying. In short: you setup an identifier, send it along with the track info, send the image bytes in packets, and then tell it you're done on the last packet.
Music Playback (obviously)Track Metadata (hopefully cover art?)Media Controls (if I can make it work)
Shairport Sync → Stereo
The next part was finding a way to get the currently played track's metadata to show on the stereo. I needed to get it out of Shairport Sync and pass it to the stereo (i.e. getting metadata out of the AirPlay session). For that, you can build Shairport Sync with metadata and cover art enabled. Once built, it’ll publish metadata info at /tmp/shairport-sync-metadata. So then I wrote a Swift parser to pull out the various metadata items I was looking for and would pass them to the stereo anytime they changed.
Putting it altogether, and skipping ahead in time, I eventually had everything that I wanted!
When I plugged the Raspberry Pi into the car, it'd trick it into thinking it was an iPhone, the car would accept USB audio, and I'd just connect my iPhone over AirPlay to the Raspberry Pi to play my music. AirPlay 1 specifically runs as lossless 44100Hz, meaning I had bit-perfect CD quality audio running wirelessly in my 720S! What's even more wild is stuff like phone calls and Siri just worked perfectly out of the box. The McLaren allows me to disable the media / audio protocols for connected Bluetooth devices and only allows the hands free protocol for sound input (i.e. microphone). I could then simultaneously connect it to AirPlay for sound output! :D
It worked perfectly and even things like chapter titles / artwork from Overcast worked!

Adding a Bit More "CarPlay"
The nice thing about wireless CarPlay is it's very hands-free. You get in the car, drive, and it's already connected. So to complete my "CarPlay", I needed a means to automate its connection.
Shortcuts to the rescue!
Sadly, iOS doesn't have a shortcut to have your iOS device connect to a specific WiFi network (because reasons)… so to have it automatically connect I configured the WiFi network my Raspberry Pi broadcasts to be the highest priority for the iPhone to connect to it. In doing so it would take precedence over my home WiFi and you can set this up via macOS and then it syncs over iCloud back to the iPhone. I then made a Shortcuts automation to automatically run when connected to the car's Bluetooth:
- Disable WiFi
- Wait a few seconds (hardcoded to roughly the boot time of the Raspberry Pi)
- Re-enable WiFi (connecting to the in-car WiFi since it has a higher priority)
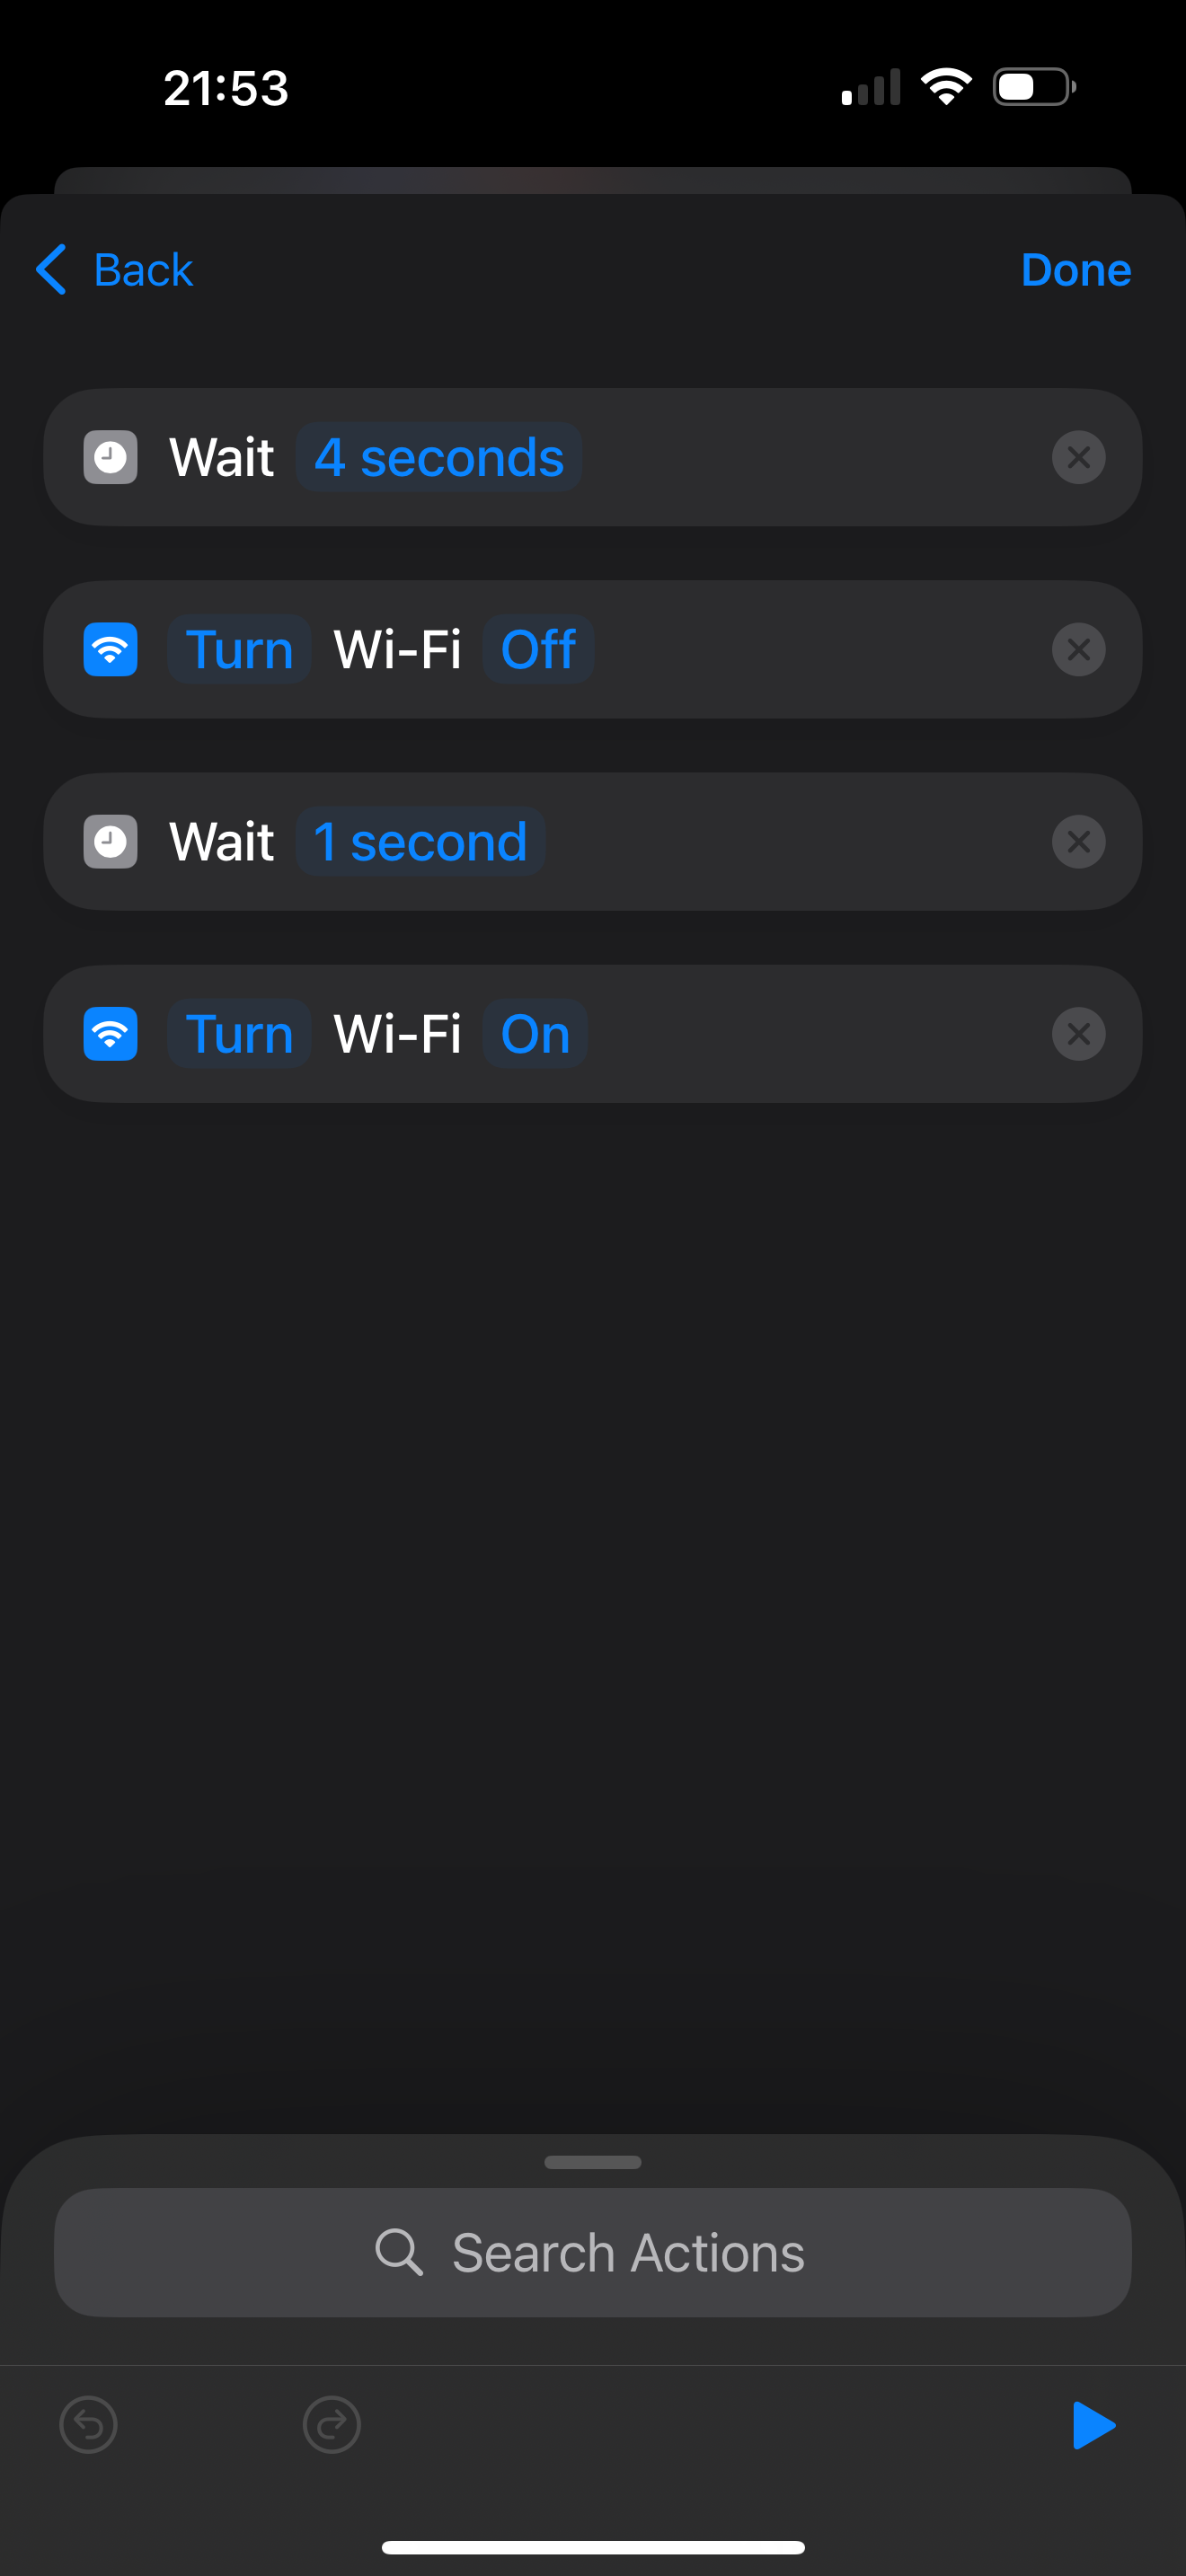
I then ran a second Shortcut automation when I connected to the in-car WiFi:
- Enable the "McLaren" focus mode on my iPhone, which populates my home screen with Albums widgets for my favourites²
- Wait a few seconds to ensure the AirPlay network is fully ready
- Set the sound output to my in-car AirPlay network
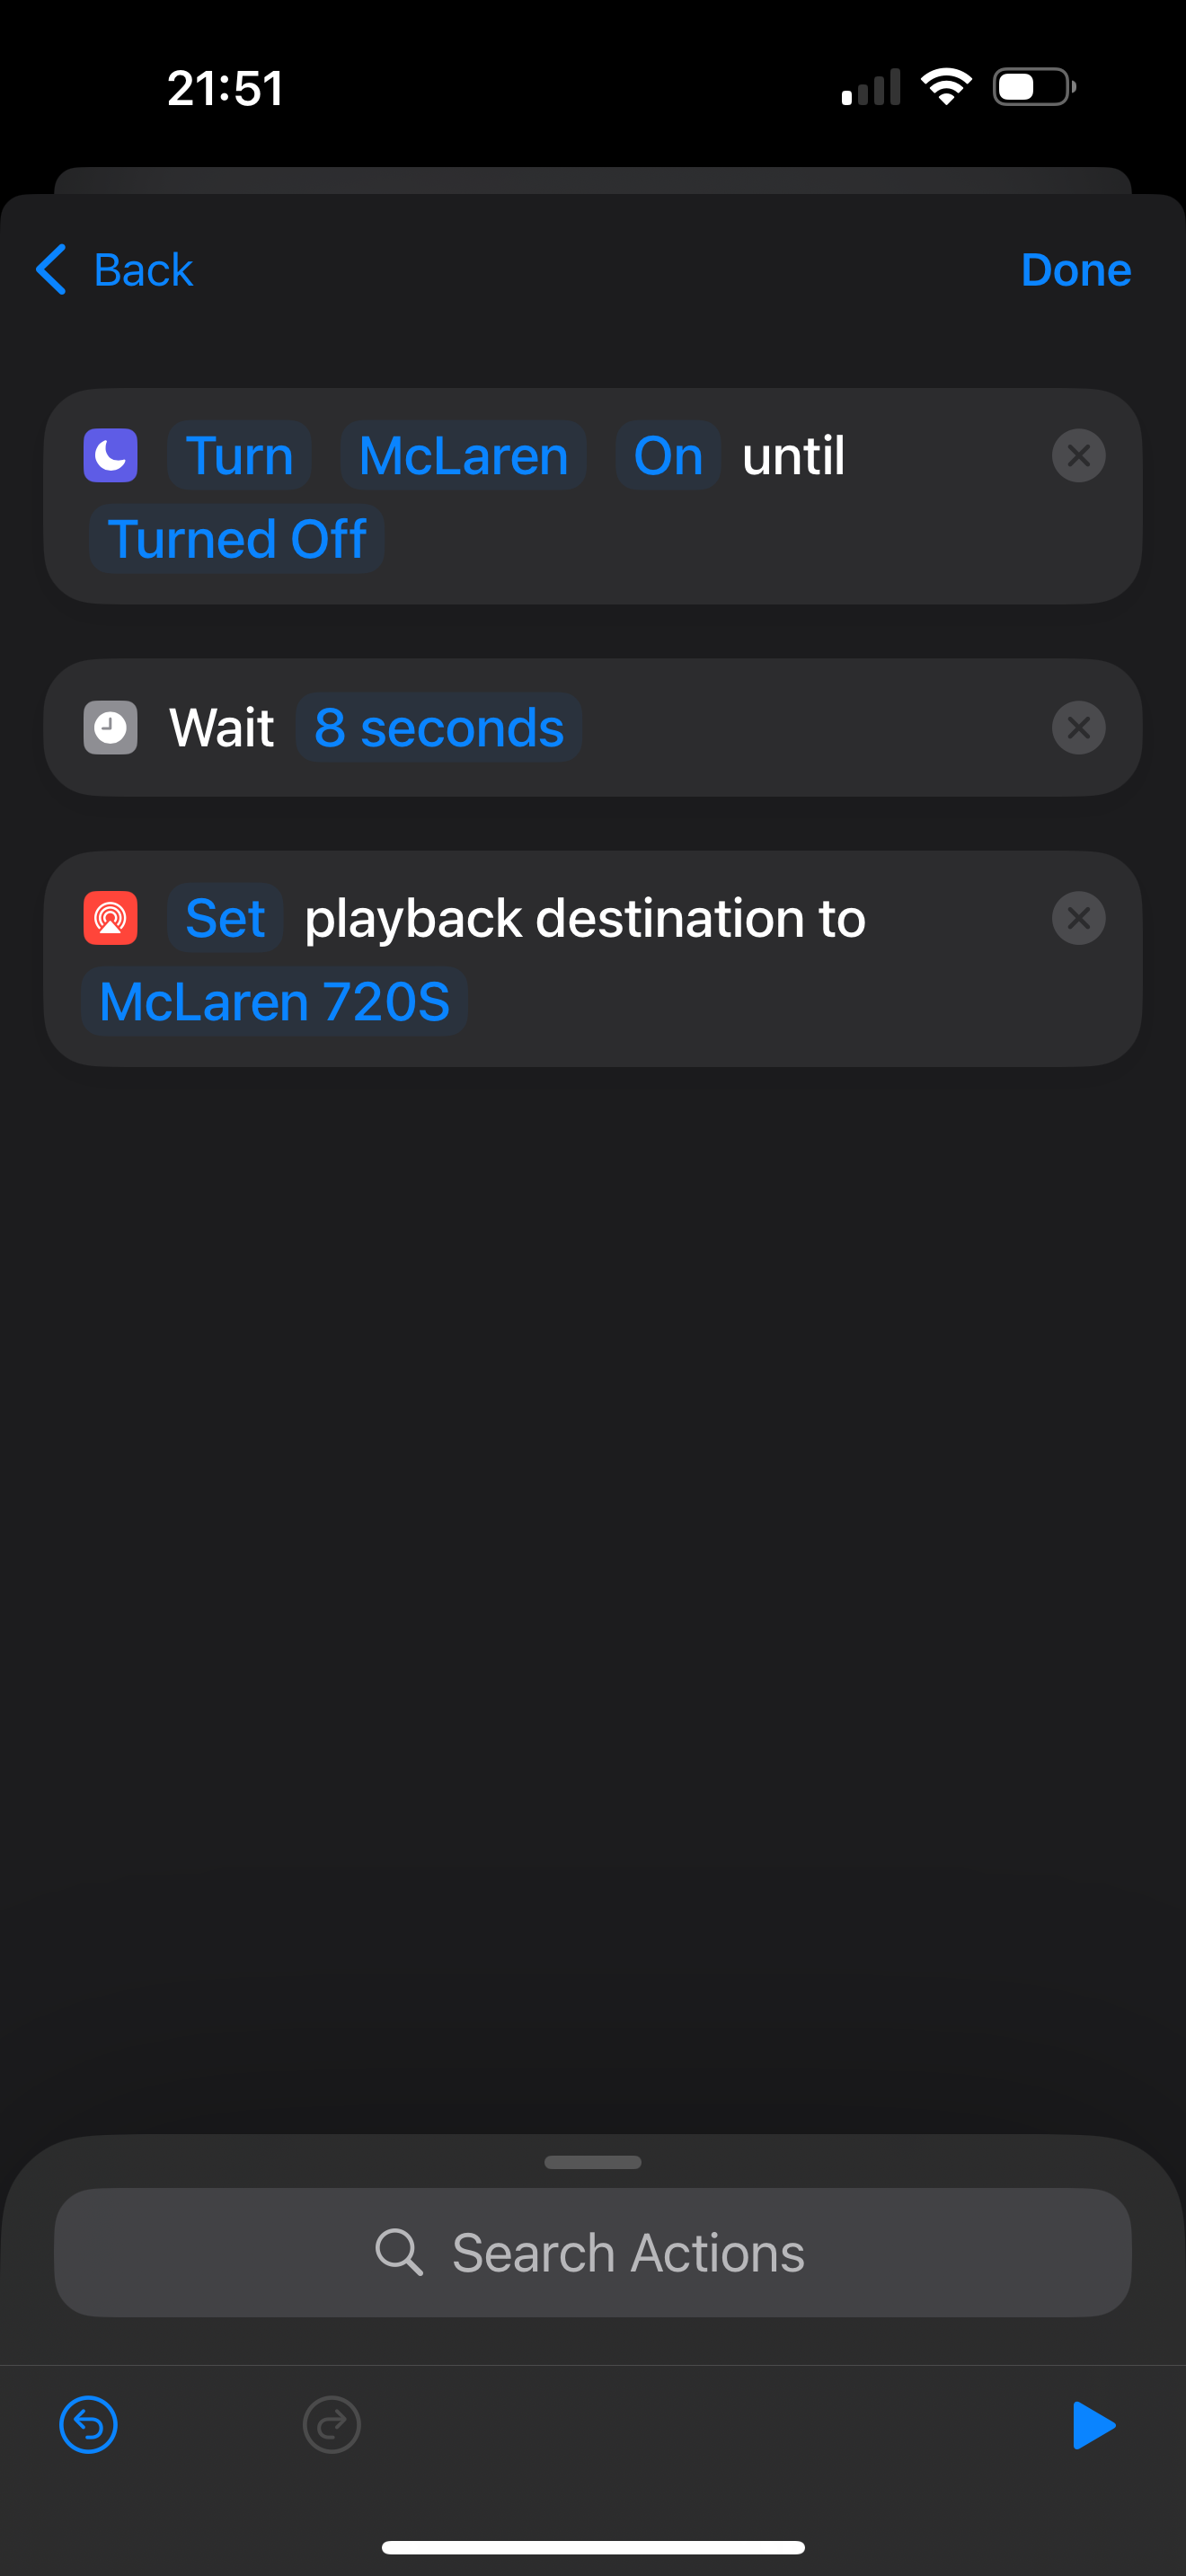
I'd then do the reverse (and pause media if playing when it ever disconnected from my in-car WiFi) to make it as seamless as possible and to ensure that music wouldn't keep playing after I parked the car.
Oops, I Broke It
One thing that didn't originally occur to me was that anytime I shut off the car… I was just cutting power to the Raspberry Pi without shutting it down safely. At one point the Raspberry Pi stopped booting entirely so I had to re-image it and set it up again.
This time I optimized the boot time to be as fast as possible (getting it down to roughly ~7s). I looked through the startup path using systemd-analyze blame and just disabled anything that wasn't related to audio or networking. I then enabled a read-only filesystem so the filesystem would just be running as a tmpfs in RAM so no more changes could be made to the Raspberry Pi and would prevent further issues.
I also had another issue where some songs would have odd distortion with certain frequencies. This took so much trial and error, but eventually I discovered that if I forced Shairport Sync's format to be S16_LE (signed 16bit little endian), the problem went away.
Lastly, I then cloned the SD Card to disk and saved it in case I ever broke something again (so I could just re-image it easily).
More Broken Stuff!!
Now of course, all this worked perfectly for a few months, and then iOS 17.4 came out and broke my media controls. -_-
It turns out that Apple removed needed parameters to control the AirPlay session (notable DACP-ID and Active-Remote), and without those there wasn't a way for me to do things like play, pause, or skip tracks.
sigh.
Well since my project was already a pile of hacks that magically worked together, I figured I could just hack it up even more. Bluetooth devices can support AVRCP (Audio/Video Remote Control Profile)… so I just made my Raspberry Pi into a fake AVRCP device and had it automatically connect to my iPhone. I'd pair my iPhone via Bluetooth additionally to the Raspberry Pi, and then the Raspberry Pi could then Play / Pause / Skip tracks on my iPhone using AVRCP (acting as a Media Player Remote Control, think Media Keys on a keyboard):
dbus-send --system --print-reply --dest=org.bluez /org/bluez/hci0/dev_00_11_22_33_44_55 org.bluez.MediaControl1.Play
Instead of sending dbus commands to Shairport Sync, I'd send them to a bluez client. I had to do some clowntown Bluetooth configuration in Linux that I don't really remember, but eventually I got things working. It definitely did not include putting a while loop in /etc/rc.local to spam connect to the iPhone over Bluetooth on boot. It was hideous, but it worked.
I then made another backup image of the disk so I never had to debug Bluetooth stuff ever again.
End Notes
Putting all this together has left me with probably one of the most hacked up piles of software that somehow works together advanced audio stacks in any McLaren 720S. I now have a car that'll automatically connect to my phone and play music in its highest available quality (as in available to native implementations on iOS… here's hoping one day AirPlay will support higher quality like 48000Hz). It's not exactly "CarPlay", but it's close enough. I need to give a huge shoutout to Mike Brady, Andrew Onyshchuk, and Christoph Walcher for all the work they did on their respective projects. I wouldn't have been able to do this without them.
This has been an incredible learning opportunity for me, exploring so many things up and down the stack: USB, Linux kernel drivers, HID transports, Bluetooth, reverse-engineering embedded systems and protocols, low level audio formats / sequences, the list goes on and on. This also allowed me to appreciate all the complexities that go into building reliable car infotainment systems. In the end this truly was a fun yet ridiculously over-engineered project to solve a simple problem. That being said, I've now got a pretty sweet computer running in my car all the time, so I've got tons of other ideas for other projects to do in the future (track day logging??). Not only that, but I have Swift powering part of my car's audio stack!
Sometimes the best solutions are those held together with digital duct tape.

¹: 🥁
²: This massive project was actually a catalyst for building Albums. Initially, I wanted a consistent way to get to my favourite music without needing to navigate small tap targets on various streaming apps, but then it ended up becoming a full-fledged app that I'm super proud of and love using all the time! :D
