Blogging in Swift
Wednesday, Apr 17, 2019
Introduction
Recently I attended try! Swift in Tokyo, Japan (which was an absolutely fantastic conference), and there I heard about a lot of folks that were using (or beginning to use) Swift on the Server. Now that Swift has reached version 5, and its ABI is stable, I thought it'd be a great time to try it out for myself. I didn't really know what to write, but I saw that @stroughtonsmith had recently rewritten his blog as a static one being served by PHP and I thought that could be a pretty cool thing to make in Swift! My previous blog was hosted on Tumblr, and it ended up being a lot of maintenance to do simple things, which was pretty discouraging from wanting to write things. I wanted to write something that would make publishing a blog with media and code samples trivial without importing thousands of dependencies.
The end result however, well, you're reading it. As of this post, my entire personal website and blog runs on a server I wrote in Swift using IBM's Kitura, which, in-turn, is running on some Linux box in the cloud. I can easily write new posts, upload media and code samples, and the backing for it is all type-safe and native (thanks to Swift). Updating it is as easy as compiling an Xcode project, and there's no more need to trawl through arcane linux directories to find error logs.
This post will go over the basics of how I wrote my blog, and how you can get started writing your own. I wrote it in a way where you can get started with little server-side code experience, so hopefully this post gets you on your feet and helps you get started in the world of Server-Side Swift.
🚨 Disclaimer 🚨
In all honesty, my 15+ years of experience with server-side code has been:
- Publishing jQuery + HTML files with Transmit's upload button
- Copying and pasting some PHP code off stackoverflow
- … and that's about it
So I went into this completely blind not knowing anything at all of what I'm supposed to be doing. ¯_(ツ)_/¯
I normally write apps, not distributed servers. This ended up being way outside my comfort zone, so I'm still learning, and if there's things I'm missing or could do better, please let me know!
Pro-tip: Don't run your server as root. It's a very bad idea.
SaaS, Swift as a Server
Starting out, I didn't really know what I should be doing or how I should start. How does one get Swift working on Linux? How does the app I write in Swift produce HTML for browsers to read? In the past, if I wanted to write scripts for my website I'd just open a new PHP file and it'd work.
I started searching and was slammed with a wall of information:
- Use Kitura with Kubernetes and Bluemix!
- Use a Vapor Docker image with Apache!
- Use NGINX + SwiftNIO!
- Setup Express and NodeJS… 🤔
All of that was a lot of dense reading and background info on a lot of technolgies I've only heard in passing. Half the time I was thinking to myself wtf is all of this?. I decided to start with the basics and just see what I could get working so I ended up picking up Kitura because their support team were super nice and it seems as though they've been contributing a fair bit to Apple's open source projects too. I have nothing against any competing open source projects (i.e. Vapor), I just personally haven't used any of them.
Anyways, setting up Kitura is pretty simple:
brew install kitura

mkdir blog-test
cd blog-test
kitura init
Note: The name of the folder you run kitura init inside is the name of the target that will be created. Here we're using blog-test.
This'll give you a barebones project setup with the Swift Package Manager. I wanted to write things in Xcode, so I did the following:
swift package generate-xcodeproj
And that created an Xcode project I could build and run with.
Note: This also adds a bunch of other stuff that I didn't end up using but could be helpful (i.e. Health, Analytics, etc.). They all are optional, so if you don't want them you can remove them.
⌘+R and you'll get a web server running at http://127.0.0.1:8080 or http://localhost:8080
Application.swift is the main entry point for things and here is where you'll setup routes. Routes are a way of parsing incoming network requests, doing some logic with them, and then giving back a response.
For example:
router.add("/neat") { (response, something, something) in
  response.write("neat! 📸")
}
Will output nothing but "neat! 📸" when you navigate to http://localhost:8080/neat. While that's cool and all, that doesn't really allow the dynamism of Swift to show, and it isn't that helpful for building sites easily. Swift + Stencils is something I adopted to make this far more easy.
Stenciling HTML
So Kitura provides out of the box support for Stencil. Stencil is a template language for Swift and is a way of adding preprocessor functionality to HTML. You can take a context defined in Swift and use that to generate or fill-in placeholders in the HTML. I needed to write a listing of all my blog entries, so I could write a stencil file like this:
<!DOCTYPE html>
<html>
  <body>
    <ul>
      {% for post in posts %}
      <li>
        {{ post.title }}
      </li>
      {% endfor %}
    </ul>
  </body>
</html>
And after using a JSON data structure like this:
{
  "posts": [
    {
      "title": "My first blog post"
    },
    {
      "title": "My second blog post"
    }
  ]
}
I could create something like this:
<!DOCTYPE html>
<html>
  <body>
    <ul>
     <li>
       My first blog post
     </li>
     <li>
       My second blog post
     </li>
   </ul>
  </body>
</html>
Neat huh? It's similar to writing inline PHP code for generating missing parts of HTML, or filling in fields as a page is being loaded. The difference, however, is Swift is supplying a single context object to the HTML stencil, which is what the stencil will be populated with.
Serving Things in Swift
To setup stenciling, we need to opt-in for it. You'll want to edit Package.swift to look something like this:
// swift-tools-version:5.0
import PackageDescription

let package = Package(
  name: "blog-test",
  dependencies: [
    .package(url: "https://github.com/IBM-Swift/Kitura.git", .upToNextMinor(from: "2.6.0")),
    .package(url: "https://github.com/IBM-Swift/HeliumLogger.git", from: "1.7.1"),
    .package(url: "https://github.com/IBM-Swift/CloudEnvironment.git", from: "9.0.0"),
    .package(url: "https://github.com/RuntimeTools/SwiftMetrics.git", from: "2.0.0"),
    .package(url: "https://github.com/IBM-Swift/Health.git", from: "1.0.0"),
    .package(url: "https://github.com/IBM-Swift/Kitura-StencilTemplateEngine.git", from: "1.8.0"),
  ],
  targets: [
    .target(name: "blog-test", dependencies: [ .target(name: "Application"), "Kitura", "HeliumLogger"]),
    .target(name: "Application", dependencies: [ "Kitura", "CloudEnvironment", "SwiftMetrics", "Health", "KituraStencil" ]),

    .testTarget(name: "ApplicationTests" , dependencies: [.target(name: "Application"), "Kitura", "HeliumLogger" ])
  ]
)
Note: At time of writing I'm using Swift 5 for this, so you may need to update .swift-version and ensure your Xcode version is at least 10.2. Also there's a strong chance these packages have updated versions now, so you'll also want to update those accordingly.
Then run the following to regenerate / update your project:
swift package update
swift package build-xcodeproj
Setting up stenciling templates isn't all that difficult. By default, Kitura will render template files provided in Views/. So let's create a folder named Views next to the Sources folder and inside Views/ create a stencil file called blog-posts.stencil.
Fill it with something like this:
<!DOCTYPE html>
<html>
  <body>
    <ul>
      {% for post in posts %}
      <li>
        {{ post.title }}
      </li>
      {% endfor %}
    </ul>
  </body>
</html>
Next, we need to have our server render the specified template file when requested, so we need to setup a route for anytime someone visits posts to populate a data structure of all the posts for filling in the template.
In Application.swift, import KituraStencil add the following just before Kitura.addHTTPServer(onPort: cloudEnv.port, with: router):
// Enable the stencil engine and add it to the router.
router.add(templateEngine: StencilTemplateEngine())

// Create a data structure to be shown by the stencil.
let posts: [String: Any] = [
  "posts": [
    [
      "title": "My First Post"
    ],
    [
      "title": "My Second Post"
    ],
  ]
]

// Anytime someone navigates to http://mysite.com/posts run this closure.
router.get("/posts") { request, response, next in
  do {
    // If it's successful in rendering, mark the response as OK.
    try response.render("blog-posts.stencil", context: posts)
    response.status(.OK)
  } catch let error {
    // Otherwise, log out an error.
    response.send(json: ["Error": error.localizedDescription])
  }

  // Calling next will allow other parts of your server to respond to similar requests (rather than just halting here).
  next()
}
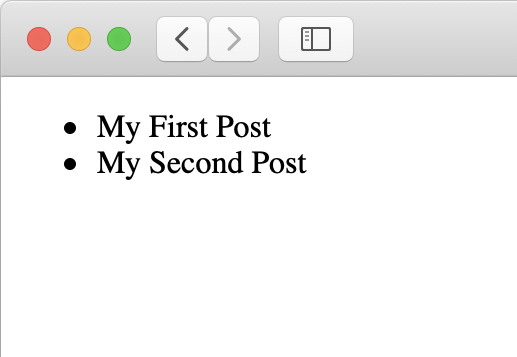
Build and run, and if you did everything correctly, open Safari and navigate to http://localhost:8080/posts.
You should see something like this:
Next steps here would be to write something to accept an arbitrary URL and use that to serve content dynamically. This would allow for linking back to specific posts via something like this:
http://localhost:8080/myPost
Kitura supports queries and variable parameters too, and it's pretty simple to declare:
router.get("/:postName") { request, response, next in
  // postName would be myPost in this case
  guard let postName = request.parameters["postName"] else {
    response.status(.notFound)
    return
  }

  // TODO: do something with the post name.

  next()
}
Kitura Markdown
One thing that you could do with that postName variable is use it to render a markdown file with a specific filename. Kitura supports it out of the box as well!
Add KituraMarkdown to your Package.swift:
.package(url: "https://github.com/IBM-Swift/Kitura-Markdown", from: "1.1.0"),
And also add it as a dependency to the Application target:
.target(name: "Application", dependencies: [ "Kitura", "CloudEnvironment", "SwiftMetrics", "Health", "KituraStencil", "KituraMarkdown" ]),
Then run and update things:
swift package update
swift package generate-xcodeproj
In Application.swift you'll want to import KituraMarkdown and add the rendering engine for it (just like the StencilTemplateEngine):
let markdownRenderer = KituraMarkdown()
markdownRenderer.setRootPaths(rootPaths: [ "Views/blog" ])
router.add(templateEngine: markdownRenderer)

let blogFileServer = StaticFileServer(path: "Views/blog")
router.get("/", middleware: blogFileServer)
Now anytime the server tries to render a markdown file inside Views/blog it'll convert the markdown file and render it as HTML. You'll also notice that we added a static file server. This is so that anytime a resource is referenced inside the markdown file (i.e. ), the server will know to transform that path myimage.png into something like Views/blog/myimage.png.
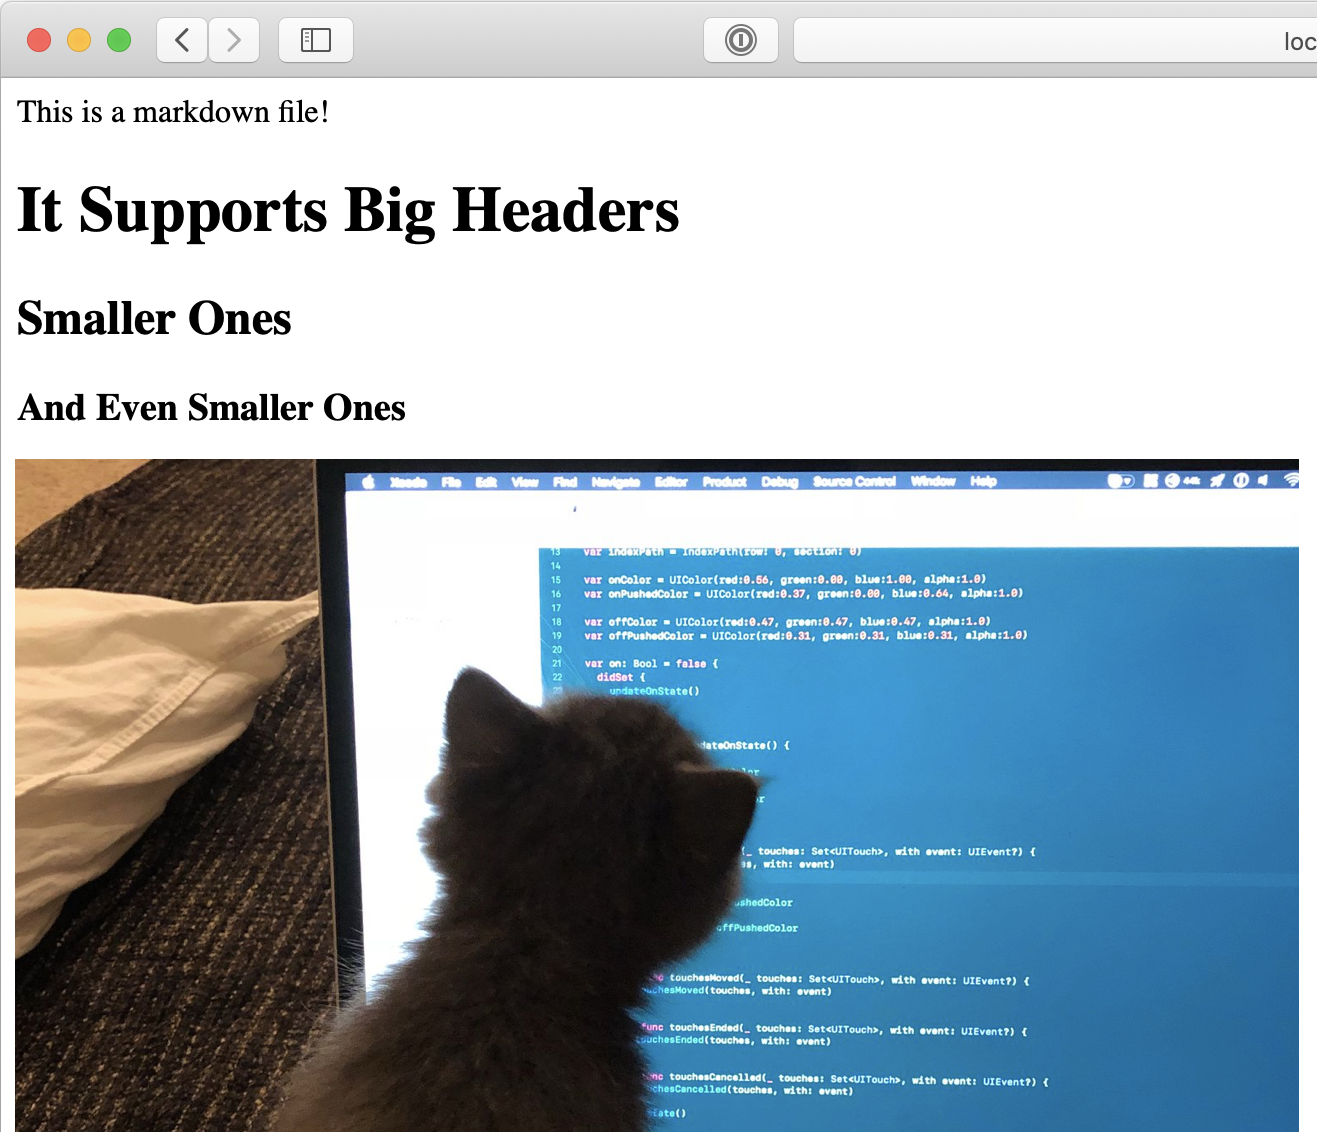
Create a markdown file called markdown-test.md inside Views/blog/ and fill it with something like this:
This is a markdown file!
# It Supports Big Headers
## Smaller Ones
### And Even Smaller Ones

Note: Don't forget about the image, feel free to swap it with whatever you like, but it's a good way to test. Just put it right next to the markdown-test.md file.
A lot of blog sites allow linking to specific blog articles usually in the form of website.com/your-blog-entry-here so we need to have a way of mapping everything after the / to a particular blog entry to render. To make things super simple, we can just map the filename. In this case, navigating to http://localhost:8080/markdown-test should render our markdown file.
To do this, we need to setup a route to handle that parameter. Kitura, again, makes this pretty easy to setup. Add the following after the blogFileServer setup code to allow the server to render arbitrarily specified markdown files:
router.get("/:postName") { request, response, next in
  // Gets the argument passed after the "/"
  guard let postName = request.parameters["postName"] else {
    response.status(.notFound)
    return
  }

  // Tries to render the markdown file named {postName}.md stored in the blog folder (contained in the Views folder)
  try response.render("blog/\(postName).md", context: [String: Any]())
  response.status(.OK)
  next()
}
Assuming everything worked, you'll have something that looks like this:
Serving / Securing Server-Side Swift
This blog post is already gigantic, so I'll be writing more in Part 2 which will be coming soon! We'll be covering how to take all of this swift server code and putting it on a server. We'll also be talking about how to setup SSL so it's nice and secure for people to consume it.
Closing Notes
Learning all of this and building it over time was a lot of fun. It's inspired me to write a lot more, especially since a lot of the pains of blogging before have been fully removed in my own workflow, written by me. Any minute changes I want I can easily change, and it's built atop a pseudo-familiar platform to me. I hope you found this guide useful, and maybe it'll get you excited about writing Swift on the server too!
If you have any questions, feel free to give me a shout on twitter.
I can't wait to write more, definitely have some things planned to talk about (synths, sounds, etc.) but until then, I'm just praying that this server doesn't get taken down :P