Blog Upgrade Time (aka Blogging in Swift Part 4)
Friday, Jan 27, 2023
Well, that was easy!
I posted about contemplating on upgrading my blog to use something like Publish so I could spend less time maintaining my blog and more time writing for it. In short, my old blog was a server I wrote myself which would take markdown files (blog posts) and dynamically convert them to HTML and serve them, this was kinda ineffecient, but it was a great learning experience. The previous blog was built atop Vapor, but with every Swift release / update to Vapor, I'd find myself rebuilding it on the server, which took forever on the tiny little server hosting this website. I had looked at using docker to containerize the whole thing, but:
- I had no idea what I was doing.
- Cross compiling docker for x86_64 (which is what my server is) on an arm64 laptop (my M1 Max MacBook Pro) was actually slower than building on the server directly, so I ditched that idea.
- I still don't even know what a kubernetes is (does anybody really?).
I saw loads of people talking very highly of Publish, so I figured I'd give it a shot. Publish does much of the same, it takes markdown files (blog posts) and prints them out to statically served HTML files, which should be a lot less overhead too (than the less efficient route I had before).
Turns out it was pretty trivial:
- I took the markdown files I had from my previous blog, and copied them over to Publish.
- I updated some of the markdown files' links to adapt to the new static site directory that Publish uses (i.e. instead of
blog.adambell.ca/date-post-titlewith Publish it'sblog.adambell.ca/posts/date-post-title). - … yeah that's pretty much it.
Building and running the site is really simple. Just build and run from within Xcode (running is what prints out the website to the Output directory), and then use publish run from within the project directory to startup a server to view it locally at http://localhost:8000.
Once done, it looked a whole lot like SwiftBySundell. 😂
This was still more than enough to get myself started however. Publish uses themes to configure how it looks, and the built-in one is just very basic. I ended up porting all the old css from the old blog to Publish's layout and that worked just fine.
The next part was getting syntax highlighting working. I was originally using pygments.js, but seeing as how much Publish focuses on being a lightweight static site generation platform, I figured I'd try using whatever it had built-in. Publish features Splash, a lightweight syntax highlighter, however when I used that, it would crash due to some recursion issue with how much whitespace I was using, so I'll file an issue for that soon. To get around this, I ended up opting for using highlight.js, but with a Publish plugin so it'll statically run highlight.js at build time and applies styles to code blocks. This means the site will look the exact same with or without javascript support enabled.
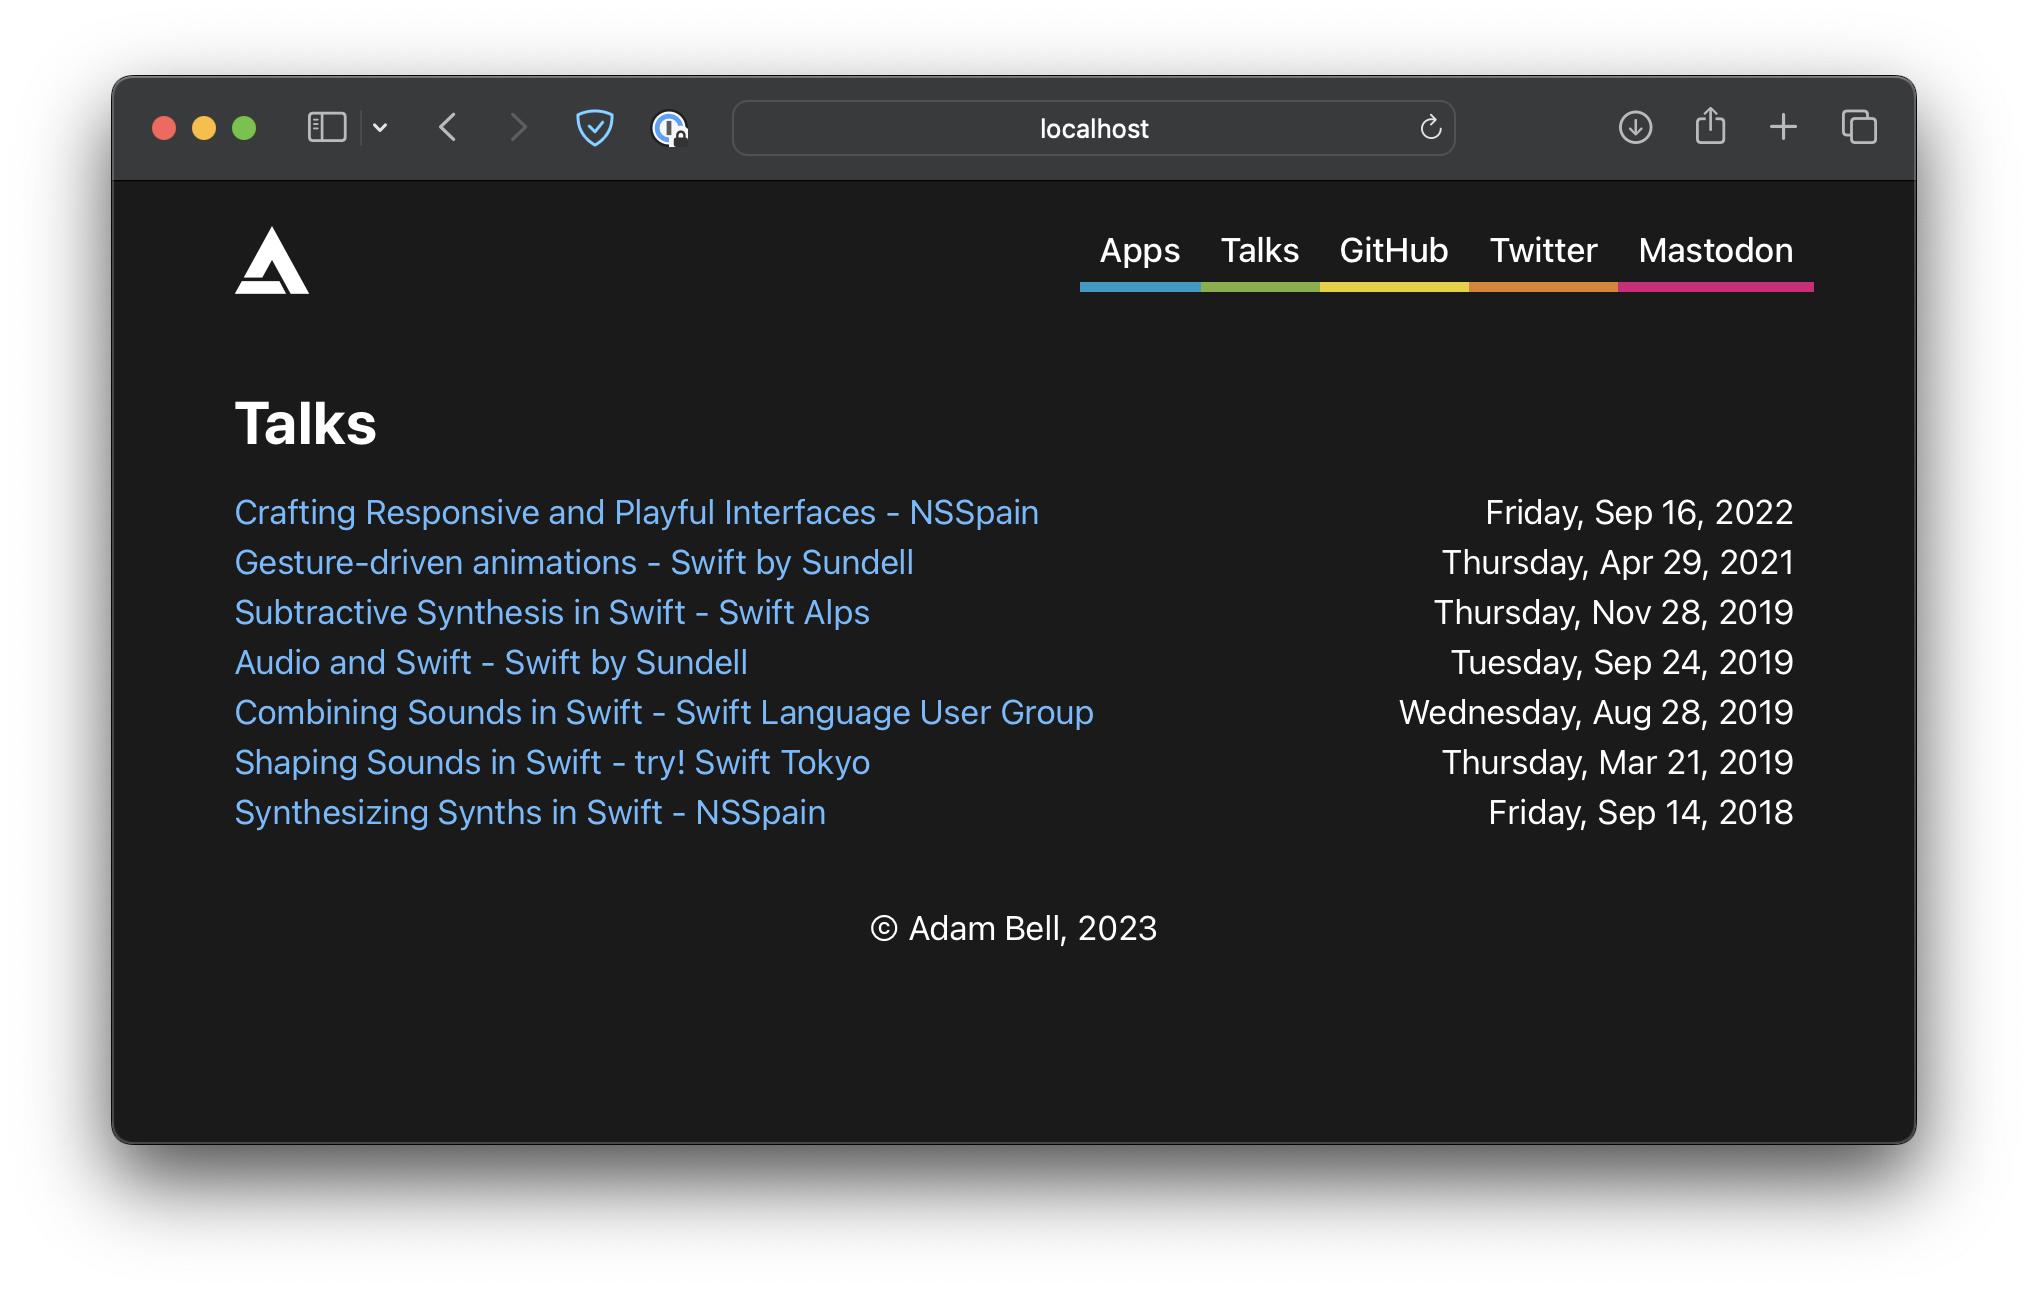
Lastly was adapting some of my other pages to work correctly, notably the Talks page and the Archive page.
I have my talks modeled from my previous blog as a struct like this:
public struct Talk: Codable {
    let date: Date

    let title: String
    let venue: String
    let URL: String

    let postDateString: String
    let localizedDateString: String

    init(title: String, venue: String, dateString: String, URL: String) {
        self.title = title
        self.venue = venue
        self.postDateString = dateString
        self.date = postDateFormatter.date(from: dateString)!
        self.localizedDateString = localizedDateFormatter.string(from: date)
        self.URL = URL
    }
}
I couldn't quite figure out how to adapt these entirely to Publish's Item protocol since I'm still learning how this all works, so I ended up just sorta doing my own thing for rendering that section of the site. I then added talks as a section to my site, and created an empty talks folder so that Publish would generate things for that section:
public struct Blog: Website {
    public enum SectionID: String, WebsiteSectionID {
        case posts
        case talks
        case archive
    }

/* ... */
So I created an array of all of my talk recordings:
public let AllTalks: [Talk] = [
    Talk(title: "Crafting Responsive and Playful Interfaces",
         venue: "NSSpain",
         dateString: "20220916",
         URL: "https://vimeo.com/751571352/3330bd3af4"),
    /* ... */
]
And within my implementation of the HTMLFactory protocol for the custom theme, I setup the section like so:
func makeSectionHTML(for section: Section<Site>, context: PublishingContext<Site>) throws -> HTML {
    switch section.id {
        case .talks:
            return HTML(
                .lang(context.site.language),
                .head(for: section, on: context.site),
                .body {
                    SiteHeader(context: context, selectedSelectionID: section.id)
                    Wrapper {
                        H1(section.title)
                        List(AllTalks) { talk in
                            Div {
                                Link("\(talk.title) - \(talk.venue)", url: talk.URL)
                                Text(talk.localizedDateString)
                            }
                            .class("talk-list-item")
                        }
                        .id("talk-list")
                    }
                    SiteFooter()
                }
            )
        /* ... */
    }
}
You'll notice here that I'm iterating over all the talks and creating a List (which effectively maps to a <ul> in HTML, with each item inside being a <div> wrapped within a <li>). It's pretty easy to assign classes or ids to things as needed so you can easily style with CSS. For sections where I didn't want rendered via this method, I just returned an empty HTML(). One example is the home page which is created via makeIndexHTML(for:context:).
Putting it altogether, it worked great!
Note: Publish has its own item management and protocols which make a lot of this more straightforward / less manual, but I didn't quite figure all that out yet, feedback is welcome!
The Archive page way was done in mostly the same way.
The SwiftUI-like syntax is powered by Plot and is really nice. I had some small hiccups trying to understand how to the syntax worked at first, but the raw HTML escape hatches were great for prototyping how things worked when I was stuck. Compared to using Vapor's leaf, I really enjoyed having the type-safety that Plot enforces, it was a lot easier dealing with getting the Swift compiler to be happy vs. debugging why the templating language wouldn't quite do what I wanted.
I also realized that the RSS configuration for my old site was kinda broken, and Publish sorta just fixed all this magically! It generates an RSS feed by default for all the posts you have, which is also another thing I don't need to keep track of.
Deploying it was also really simple. Syncing the Output directory to an nginx server and adding some rewrite rules to map the old blog URLs to the newer format was added to preserve other articles linking back here and avoid link rot.
All in all, it was maybe a few hours of work to port the whole thing over. I even left some room for some more fun to overhaul the navigation and add some springs for fun! :)
This should be the last post here about writing blogs in Swift (hopefully). I have some more stuff in store, especially about animations!
Hopefully now that there's less maintenance needed for this blog, I can write a whole lot more! The lightweight nature of Publish and its simplicity has already made writing this post way more fun! It's also far faster to render (with javascript no longer necessary for syntax highlighting) and acts as a normal statically hosted website (no dynamic swift server code).
Thanks John for making Publish! :)